<?xml version="1.0" encoding="utf-8"?><feed xmlns="http://www.w3.org/2005/Atom" ><generator uri="https://jekyllrb.com/" version="3.10.0">Jekyll</generator><link href="https://charnley.github.io/blog/feed.xml" rel="self" type="application/atom+xml" /><link href="https://charnley.github.io/blog/" rel="alternate" type="text/html" /><updated>2026-02-27T08:03:12+00:00</updated><id>https://charnley.github.io/blog/feed.xml</id><title type="html">Ticket-driven Development Blog</title><subtitle>This blog will contain technical write-ups with very varying contents. We will try to use tags/category as much as possible to avoid mixing everything up. Usually content is about some github project we made.</subtitle><entry><title type="html">Building Tutorials as-code, using Playwright and Piper</title><link href="https://charnley.github.io/blog/2026/02/24/automated-tutorial-as-code-playwright-piper.html" rel="alternate" type="text/html" title="Building Tutorials as-code, using Playwright and Piper" /><published>2026-02-24T00:00:00+00:00</published><updated>2026-02-24T00:00:00+00:00</updated><id>https://charnley.github.io/blog/2026/02/24/automated-tutorial-as-code-playwright-piper</id><content type="html" xml:base="https://charnley.github.io/blog/2026/02/24/automated-tutorial-as-code-playwright-piper.html"><![CDATA[<p>tldr:
tutorials-as-code.
Using <code class="language-plaintext highlighter-rouge">playwright</code> for end-to-end browser testing, and overlaying text-to-speech using <code class="language-plaintext highlighter-rouge">Piper</code>,
we can create automated tutorials, every time the user interface or application changes.
Example code: <a href="https://github.com/charnley/example-tutorial-as-code">github.com/charnley/example-tutorial-as-code</a>.</p>

<blockquote>
  <p><strong>Play with sound</strong>
<!-- > <video style="max-width:100%" controls playsinline src="/blog/assets/images/about_tutorial/localhost_recording_compressed.mp4"></video> --></p>
  <video style="max-width:100%" controls="" playsinline="" src="https://github.com/charnley/blog/raw/refs/heads/main/assets/images/about_tutorial/localhost_recording_compressed.mp4"></video>
</blockquote>

<h1 id="recording-tutorials-are-expensive">Recording Tutorials are Expensive</h1>

<p>I work in a small team.
Like most small teams, documentation is always in the backlog.
Far, far into the backlog.
Constantly fighting proverbial fires and reacting to ad-hoc requests, leaves little time for writing user documentation, let alone recording tutorial videos.</p>

<p>We don’t have the budget for a video crew and voice actors or time to update every time UI updates, so the conventional video tutorials are out of the question.
Someone has to plan, record, narrate, edit, and redo them when flows change.
Even larger teams with dedicated “e-learning” resources tend to produce one-off recordings that quickly go stale.</p>

<blockquote>
  <p>“Oh no, don’t press that button. Did you watch the tutorial? You shouldn’t, sorry, that is outdated now” - Manual Tutorial User</p>
</blockquote>

<p>The only tutorials that survive are the ones which are cheap to produce and cheaper to update.
A solution to this is treating them like software artifacts, not media files.
Infrastructure is code. Deployments are code. Tests are code. Tutorials should be too.</p>

<p>What really clicked for me was when a super user of ours recorded himself using an application,
then added speech using Microsoft text-to-speech — thanks Thierry.
My first thought was: “but, I can just automate the recording!”.</p>

<p>What we test and what we want to document is usually the same thing.
Add text-to-speech, and suddenly we can turn scripts into reproducible, maintainable tutorial videos without a crew.
“Do more with less”, is a fitting sentence I’ve heard.</p>

<blockquote>
  <p>Treating Video Tutorials Like Infrastructure. Tutorial-as-code.</p>
</blockquote>

<blockquote>
  <p>“VDD - Video Driven Development” - Denis</p>
</blockquote>

<p>Here’s my hot take: Internally developed desktop applications are basically a relic. From what I see, everything is web-based now.
<a href="https://playwright.dev/">Playwright</a> to record actions plus 
<a href="https://github.com/OHF-Voice/piper1-gpl">Piper</a>
to record voice overs is all we need.</p>

<h1 id="emulating-the-browser-with-playwright">Emulating the browser with Playwright</h1>

<p>If you don’t know <a href="https://playwright.dev/">Playwright</a>,
it is a browser automation and end-to-end testing tool for both JavaScript and Python.
It lets you script real browser interactions — clicks, form fills, navigation — and run them headlessly or with a visible browser window.</p>

<p>For our purposes, we set up a script that pretends to be a user running through a full workflow.
A great starting point is the <code class="language-plaintext highlighter-rouge">codegen</code> command, which records your manual interactions and outputs the equivalent Playwright code:</p>

<div class="language-bash highlighter-rouge"><div class="highlight"><pre class="highlight"><code>python <span class="nt">-m</span> playwright codegen https://localhost:5173/
</code></pre></div></div>

<blockquote>
  <p><img src="/blog/assets/images/about_tutorial/playwright-codegen-localhost_resize.png" alt="
Using Playwright Codegen to navigate a website
" /></p>
</blockquote>

<p>You interact with the browser and your actions appear as generated code in a side panel.
This is especially useful for capturing and codifying longer workflows.
To run a workflow you initialize a browser with a <code class="language-plaintext highlighter-rouge">page</code> and run actions on it, then record the actions in a video, as seen in this snippet:</p>

<div class="language-python highlighter-rouge"><div class="highlight"><pre class="highlight"><code><span class="kn">from</span> <span class="nn">playwright.sync_api</span> <span class="kn">import</span> <span class="n">sync_playwright</span>
<span class="c1"># Init the browser, with defined outpout video path and browser dimensions.
</span><span class="n">playwright_obj</span> <span class="o">=</span> <span class="n">sync_playwright</span><span class="p">().</span><span class="n">start</span><span class="p">()</span>
<span class="n">browser</span> <span class="o">=</span> <span class="n">playwright_obj</span><span class="p">.</span><span class="n">chromium</span><span class="p">.</span><span class="n">launch</span><span class="p">(</span><span class="n">headless</span><span class="o">=</span><span class="bp">True</span><span class="p">)</span>
<span class="n">viewpoint</span> <span class="o">=</span> <span class="p">{</span><span class="s">"width"</span><span class="p">:</span> <span class="n">browser_width</span><span class="p">,</span> <span class="s">"height"</span><span class="p">:</span> <span class="n">browser_height</span><span class="p">}</span>
<span class="n">context</span> <span class="o">=</span> <span class="n">browser</span><span class="p">.</span><span class="n">new_context</span><span class="p">(</span><span class="n">record_video_dir</span><span class="o">=</span><span class="n">work_dir</span><span class="p">,</span> <span class="n">viewport</span><span class="o">=</span><span class="n">viewpoint</span><span class="p">,</span> <span class="n">record_video_size</span><span class="o">=</span><span class="n">viewpoint</span><span class="p">)</span>

<span class="c1"># Get the page object to apply actions on
</span><span class="n">page</span> <span class="o">=</span> <span class="n">context</span><span class="p">.</span><span class="n">new_page</span><span class="p">()</span>

<span class="c1"># Do actions on `page`
</span><span class="p">...</span>

<span class="c1"># Get the video path of the actions
</span><span class="n">path</span>  <span class="o">=</span> <span class="n">page</span><span class="p">.</span><span class="n">video</span><span class="p">.</span><span class="n">path</span><span class="p">()</span>

<span class="c1"># Stop and close playwright, browser and context
</span><span class="p">...</span>
</code></pre></div></div>

<p>Playwright fills input incredibly fast by default — faster than any human would type. To make the automation feel more natural, 
we should slow things down with pauses and realistic typing speeds.
Adding small delays can improve the flow of demonstrations, especially when narration needs time to keep up. 
In simple cases, using <code class="language-plaintext highlighter-rouge">page.wait_for_timeout</code> is an effective way to space out actions and create a more human-like pacing.</p>

<p>For convience I created some Playwright specific functions that makes interactions more natural looking.</p>

<ul>
  <li><strong>Human typing:</strong> adding random delays to the typing <code class="language-plaintext highlighter-rouge">random.uniform(0.2, 0.5)</code> as well as random typing errors <code class="language-plaintext highlighter-rouge">random.choice("abcdef")</code> followed by <kbd>backspace</kbd>.</li>
  <li><strong>Element highlight:</strong> Add CSS class to an element to highlight it with a blue color <code class="language-plaintext highlighter-rouge">element.evaluate(f"el =&gt; el.classList.add('highlight')")</code>.</li>
  <li><strong>Remove focus:</strong> Also know as <a href="https://developer.mozilla.org/en-US/docs/Web/API/HTMLElement/blur">blur</a>, which is pretty easy with <code class="language-plaintext highlighter-rouge">page.mouse.click(0, 0)</code>.</li>
</ul>

<p>And with that we can pretty naturally navigate through a interface, and output a video.
If something goes wrong you can disable the headless mode and debug it with a <code class="language-plaintext highlighter-rouge">codegen</code> session.</p>

<blockquote>
  <p><strong>Note:</strong> Playwright works way better in headless mode for recordings.
If not in headless mode, you will get whitespace around your viewpoint.</p>
</blockquote>

<blockquote>
  <p><strong>Note:</strong> Because it can run headless, that also means it works great in a docker-based run.
Making it very CI/CD-pipeline friendly.</p>
</blockquote>

<h1 id="emulating-voice-over-with-piper-tts">Emulating voice-over with Piper TTS</h1>

<blockquote>
  <p><strong>Edit:</strong> I chose Piper TTS at the point of writing, but <a href="https://github.com/KittenML/KittenTTS">Kitten TTS</a> looks very promising. Thanks Patrick.</p>
</blockquote>

<p>The browser emulation doesn’t contain any sound, so we need to generate a overlay narration that goes with each action.
First I looked at <code class="language-plaintext highlighter-rouge">festival</code> — familiar, <code class="language-plaintext highlighter-rouge">apt</code>-installable, but the output is more robotic than Microsoft Sam.
Instead I found <strong>Piper TTS</strong>, which seems to be a project that has changed owner quite a few times, but has now landed under the ownership of <a href="https://www.openhomefoundation.org">Open Home Foundation</a>.</p>

<!-- [newsletter.openhomefoundation.org/piper-is-our-new-voice-for-the-open-home](https://newsletter.openhomefoundation.org/piper-is-our-new-voice-for-the-open-home/). -->

<p>This is great, as I am already quite a big fan of Home Assistant and the foundation behind it.
Piper TTS is a fast, local and open-source model for TTS with a big variety of voices and languages.
Even the most romantic European language: Danish.
See <a href="https://rhasspy.github.io/piper-samples/">Piper Samples</a>.</p>

<p>At times it still sounds a bit robotic, but not really distractingly so.
I have found the English voice “Amy” to be a good choice — natural enough that listeners focus on the content rather than the voice.
There is a slight issue with unnatural short breaks between sentences, which I fixed by splitting the narration into one audio file per sentence.</p>

<p>Example:</p>

<div class="language-text highlighter-rouge"><div class="highlight"><pre class="highlight"><code>Hi. This is Amy speaking, presenting MolCalc.
Let's try to make a quantum calculation. Press the search, type in "Pro-pa-nol", then enter.
The molecule is loaded from Cactus.
Then we press "Calculate", and whoop, we have properties.
</code></pre></div></div>

<div class="language-bash highlighter-rouge"><div class="highlight"><pre class="highlight"><code>python <span class="nt">-m</span> piper <span class="nt">-m</span> en_US-amy-medium <span class="nt">-i</span> ./how_to_molcalc.txt <span class="nt">-f</span> ./how_to_molcalc.mp3
</code></pre></div></div>

<blockquote>
  <audio style="max-width:100%" controls="" playsinline="" src="/blog/assets/images/about_tutorial/amy_hello_molcalc.mp3"></audio>
</blockquote>

<p>Does it sound robotic? Slightly, yes — but still impressive for a fully local, offline model.
For extra point in your tutorial, you can even <a href="https://github.com/OHF-Voice/piper1-gpl/blob/main/docs/TRAINING.md">train your own voice</a>.</p>

<h1 id="combining-the-two">Combining the two</h1>

<p>The tutorial is written as a list of sections/scenes.
Each section is a pair: what the browser does, and what is narrated.</p>

<pre><code class="language-mermaid">flowchart TD
    A[Tutorial script] --&gt; B[Synthesise narration audio]
    A --&gt; C[Record browser session]
    C --&gt; C2[Pause if audio is longer than action]
    B --&gt; D[Synchronise audio to video timestamps]
    C2 --&gt; D
    D --&gt; E[Export merged video]
</code></pre>

<p>It is a question of timing.
Browser actions often finish faster than the narration.
If you don’t account for that, the next section starts while Amy is still talking.
The fix is simple: pause the browser until the audio finishes.</p>

<p>In the example repo, I use a decorator to link them together into two lists.
The main reason for the decorator is just to keep narration and actions physically together in the code.
A side effect is that I just comment out the <code class="language-plaintext highlighter-rouge">@add_section</code> decorator and that removes the section from the tutorial.</p>

<div class="language-python highlighter-rouge"><div class="highlight"><pre class="highlight"><code><span class="o">@</span><span class="n">add_section</span><span class="p">(</span><span class="s">"Narration Text"</span><span class="p">)</span>
<span class="k">def</span> <span class="nf">section_name</span><span class="p">(</span><span class="n">page</span><span class="p">:</span> <span class="n">Page</span><span class="p">):</span>
    <span class="n">page</span><span class="p">.</span><span class="n">do_action</span><span class="p">()</span>
    <span class="p">...</span>
</code></pre></div></div>

<p>Then stitch it together using <code class="language-plaintext highlighter-rouge">moviepy</code>.</p>

<h1 id="conclusion--closing-thoughts">Conclusion / Closing thoughts</h1>

<p>What if the app changes and the tutorial script stops working? Good.
That means your application changed and the tutorial needs updating — which is exactly the point.
Because Playwright is a testing framework, a broken tutorial script is just a failing test.
It forces the maintainer to revisit it, which is far better than a silently outdated video.</p>

<ul>
  <li>Stop treating tutorials as recordings, treat them as <strong>software artifacts</strong>. If it matters, automate it. If it can’t be regenerated, it’s already broken/outdated.</li>
  <li><strong>Keep videos slow.</strong> Viewers can always watch at 1.5x speed, but can’t easily be slowed down if a section is unclear.</li>
  <li><strong>Use AI to help with timing.</strong> LLMs are surprisingly good at splitting <code class="language-plaintext highlighter-rouge">codegen</code> output into human-paced steps with sensible wait times. Especially given examples. They can even generate the text.</li>
  <li><strong>Prefer micro-tutorials.</strong> Short, focused walkthroughs of a single flow teach better than long all-in-one recordings. See the tutorials as integration test for a certain use-case.</li>
</ul>

<p>Happy tutorial-ing.</p>

<h2 id="appendix-how-to-setup">Appendix: How to setup</h2>

<p>Go see the example code at <a href="https://github.com/charnley/example-tutorial-as-code">github.com/charnley/example-tutorial-as-code</a>.</p>

<p>The example uses a small <a href="https://svelte.dev/">SvelteKit</a> app with <a href="https://tailwindcss.com/">TailwindCSS</a> and <a href="https://shadcn-svelte.com">shadcn-svelte</a> components,
which I very much prefer over React.
Obviously the web stack doesn’t matter, as
any web application will work with Playwright.
Svelte just happens to be fast to spin up for a demo.</p>

<h2 id="references">References</h2>

<ul>
  <li><a href="https://github.com/charnley/example-tutorial-as-code">github.com/charnley/example-tutorial-as-code</a></li>
  <li><a href="https://playwright.dev/">playwright.dev</a></li>
  <li><a href="https://github.com/OHF-Voice/piper1-gpl">github.com/OHF-Voice/piper1-gpl</a></li>
  <li><a href="https://rhasspy.github.io/piper-samples/">rhasspy.github.io/piper-samples</a></li>
  <li><a href="https://newsletter.openhomefoundation.org/piper-is-our-new-voice-for-the-open-home/">newsletter.openhomefoundation.org — Piper is our new voice for the open home</a></li>
  <li><a href="https://github.com/KittenML/KittenTTS">github.com/KittenML/KittenTTS</a></li>
  <li><a href="https://github.com/Zulko/moviepy">github.com/Zulko/moviepy</a></li>
  <li><a href="https://svelte.dev/">svelte.dev</a></li>
  <li><a href="https://tailwindcss.com/">tailwindcss.com</a></li>
  <li><a href="https://shadcn-svelte.com">shadcn-svelte.com</a></li>
</ul>]]></content><author><name></name></author><category term="tutorial," /><category term="documentation," /><category term="programming" /><summary type="html"><![CDATA[tldr: tutorials-as-code. Using playwright for end-to-end browser testing, and overlaying text-to-speech using Piper, we can create automated tutorials, every time the user interface or application changes. Example code: github.com/charnley/example-tutorial-as-code.]]></summary></entry><entry><title type="html">Taking Notes With The Terminal - Context Switching Without Losing Your Mind</title><link href="https://charnley.github.io/blog/2026/01/03/note-taking-for-programmers-zk-vscode-vim.html" rel="alternate" type="text/html" title="Taking Notes With The Terminal - Context Switching Without Losing Your Mind" /><published>2026-01-03T00:00:00+00:00</published><updated>2026-01-03T00:00:00+00:00</updated><id>https://charnley.github.io/blog/2026/01/03/note-taking-for-programmers-zk-vscode-vim</id><content type="html" xml:base="https://charnley.github.io/blog/2026/01/03/note-taking-for-programmers-zk-vscode-vim.html"><![CDATA[<p>tl;dr: My pitch is,
you anyway write your notes in Markdown-like text files;
why not index and search them with <a href="https://github.com/zk-org/zk">zk-org</a>?
I use Neovim, but the setup is editor agnostic.
This is not overkill.</p>

<p><img src="/blog/assets/images/about_zk/zk_demo.gif" alt="
" /></p>

<!-- ## Context switching is productivity killer -->
<h2 id="context-switching-is-your-problem">Context switching is your problem</h2>

<p>I constantly jump between meetings, problems, and digital fires, all while trying to maintain a strategic overview.
Privately, I juggle too many open projects as well.
Half my stress isn’t the work itself — it’s trying to remember where I left off.
My brain never reloads context fast enough.
If you feel a little ADHD-ish at work, it might not be you.
You might just need a better todo/notes system.</p>

<p>I tried the usual tools:</p>

<ul>
  <li><a href="https://trello.com">Trello</a> for recipes and daily todos.</li>
  <li><a href="https://www.notion.so/">Notion</a> / <a href="https://tasksboard.com">Google Tasks</a> for project notes.</li>
  <li>Emailing myself links as a “read later” system.</li>
  <li><a href="https://to-do.office.com/tasks/">Outlook “To Do”</a> at work.</li>
</ul>

<p>None of it felt natural.
I don’t want another app, dashboards, backlinks, or
<a href="https://help.obsidian.md/plugins/graph">graphs of my notes</a>.
I want something fast, searchable, and editable in the text/code editor I already use.
That rules out tools like
<a href="https://obsidian.md/">Obsidian</a>.</p>

<p>What worked best was keeping everything in a single file per day—meetings, tasks, and stray thoughts.
<code class="language-plaintext highlighter-rouge">vim ~/todo/$(date +%Y-%m-%d).md</code>.
But when I switch context \(5\cdot10^6\) times a day, even a simple daily log can turn into a mess.</p>

<p>From Sönke Ahrens in his book “<a href="https://www.soenkeahrens.de/en/takesmartnotes">How to Take Smart Notes</a>” we can use <a href="https://en.wikipedia.org/wiki/Cognitive_load">Cognitive offloading</a> to focus.
Our brains are for having ideas, not holding them.</p>

<blockquote>
  <p>Writing things down lets your brain focus on other tasks, <strong>but only if you can easily find them again</strong>.
If notes are hard to retrieve, your brain won’t trust the system.</p>
</blockquote>

<p>It’s an interesting book if you enjoy deconstructing the concept of a note and the cult-like enthusiasm for <a href="https://en.wikipedia.org/wiki/Zettelkasten">Zettelkasten</a>. I didn’t.
But the point is clear: <strong>I need to find a way to quickly write down AND search my notes, without a specialized window open</strong>.</p>

<h2 id="the-solution-you-are-looking-for-is-zk">The solution you are looking for is “<a href="https://zk-org.github.io/zk/">zk</a>”</h2>

<p>The obvious solution is to write things down.
The practical problem is making those notes fast to create and fast to find.
This year, I found <strong><a href="https://github.com/zk-org/zk.git">zk-org/zk</a></strong>, and it turned out to be exactly what I wanted:
A small CLI tool that <strong>indexes and searches Markdown files</strong>.</p>

<p>You write notes as plain Markdown in your editor.
<code class="language-plaintext highlighter-rouge">zk</code> keeps an index (SQLite) and lets you instantly search by title, tag, content, or date.
No daemon. No UI. Just open the note in your editor.</p>

<p><img src="/blog/assets/images/about_zk/zk_search_resize.png" alt="
" /></p>

<p>Like Obsidian, <code class="language-plaintext highlighter-rouge">zk</code> is Zettelkasten-based, but unlike Obsidian, it stops at indexing and search.</p>

<p>In practice, my notes follow a simple structure:
Metadata for indexing, free text for thinking, and Markdown tasks for follow-ups.</p>

<div class="language-markdown highlighter-rouge"><div class="highlight"><pre class="highlight"><code><span class="nn">---</span>
<span class="na">date</span><span class="pi">:</span> <span class="s">December 05, </span><span class="m">2025</span>
<span class="na">title</span><span class="pi">:</span> <span class="s">Title of my Meeting</span>
<span class="na">tags</span><span class="pi">:</span> <span class="pi">[</span><span class="nv">tag1</span><span class="pi">,</span><span class="nv">tag2</span><span class="pi">]</span>
<span class="nn">---</span>

Kristoffer, Kim, Jimmy
<span class="p">
-</span> This is an example meeting/note.
<span class="p">-</span> Maybe a meeting? Maybe a project? But interesting things were discussed.
<span class="p">
-</span> [ ] This is an example of a open task
<span class="p">-</span> [x] This is an example of a closed task
</code></pre></div></div>

<p>Because it is a CLI tool, you can very easily customize the workflow with standard GNU tools,
and <a href="https://github.com/junegunn/fzf">terminal fuzzy-finding</a> and <a href="https://github.com/BurntSushi/ripgrep">ripgrep</a>.
This is where <code class="language-plaintext highlighter-rouge">zk</code> really shines if you enjoy composing small tools.
For example using GNU <code class="language-plaintext highlighter-rouge">date</code> you can use relative dates to access todo list for other days.</p>

<div class="language-toml highlighter-rouge"><div class="highlight"><pre class="highlight"><code><span class="py">todo</span> <span class="p">=</span> <span class="s">'zk new --group todo --no-input --date "$(date -d "$*" +%Y-%m-%d)" "$ZK_NOTEBOOK_DIR/todo" --template todo.md'</span>
</code></pre></div></div>

<div class="language-bash highlighter-rouge"><div class="highlight"><pre class="highlight"><code>zk todo <span class="c"># open today's todo-list</span>
zk todo tomorrow <span class="c"># open tomorrows todo-list</span>
zk todo next monday
zk todo yesterday
</code></pre></div></div>

<p>For the last months working with <code class="language-plaintext highlighter-rouge">zk</code> I got annoyed I didn’t start earlier. I remember working on something else
years ago, but not the the details. Where are my notes??
I know I worked with this before!</p>

<h3 id="i-dont-want-to-use-vim">I don’t want to use vim</h3>

<p>But have you heard of <a href="https://github.com/neovim/neovim">Neovim</a>?</p>

<p>Okay, That’s fine.
<code class="language-plaintext highlighter-rouge">zk</code> has nothing to do with your editor.
It indexes and searches notes.
Opening and editing is delegated entirely to whatever editor you prefer.</p>

<p><img src="/blog/assets/images/about_zk/vscode_and_zk_resize.png" alt="
VSCode using zk in the terminal to search notes
" /></p>

<p>If you are using VSCode or equivalent, you can configure <code class="language-plaintext highlighter-rouge">zk</code> <code class="language-plaintext highlighter-rouge">config.toml</code> to set the editor,</p>

<div class="language-toml highlighter-rouge"><div class="highlight"><pre class="highlight"><code><span class="py">editor</span> <span class="p">=</span> <span class="s">"code -r"</span> <span class="c"># Using VSCode</span>
<span class="py">editor</span> <span class="p">=</span> <span class="s">"idea"</span> <span class="c"># Using IntelliJ</span>
</code></pre></div></div>

<p>So when you select/create new notes they will be open straight in your editor.
Note there is also a optional VSCode plugin <a href="https://github.com/zk-org/zk-vscode">github.com/zk-org/zk-vscode</a>,
however it is not needed.
Just use the VSCode terminal to search notes.</p>

<h2 id="how-i-use-zk-at-work">How I use <code class="language-plaintext highlighter-rouge">zk</code> at work</h2>

<p>At work, I use <code class="language-plaintext highlighter-rouge">zk</code> as a searchable work log, meeting archive, and task tracker.
My notes is are a folder full of Markdown files that I could be storing on OneDrive,
but I still like to have the history tracking of my notes, so in the end I use Git to manage my notes, and using OneDrive as a <code class="language-plaintext highlighter-rouge">git --bare</code> server (<a href="https://git-scm.com/book/en/v2/Git-on-the-Server-Getting-Git-on-a-Server">setup git bare server</a>) for backup.</p>

<pre><code class="language-mermaid">
flowchart LR
    Editor["Your Editor&lt;br /&gt;(VSCode / Vim)"]
    Notes["~/notes&lt;br /&gt;(Git Repo)"]
    OneDrive["~/OneDrive/notes.git&lt;br/&gt;(Remote --bare Backup)"]

    Editor --&gt; Notes
    Notes --&gt;|git push| OneDrive
</code></pre>

<p>In practice, this means</p>

<ul>
  <li>Daily todos to stay focused.</li>
  <li>Meeting notes with attendees and follow-ups.</li>
  <li>Tags for projects and recurring topics.</li>
  <li>Markdown tasks to track unfinished work.</li>
  <li>Searches for open tasks to surface forgotten items.</li>
  <li>A personal wiki for internal links, runbooks, and snippets.</li>
</ul>

<p>Since I am at work, I don’t mind the in-house licensed AI models reading my notes,
I can copy-paste meeting transcripts, use Sonnet to convert them to Markdown, and find follow-ups.
Obviously, I use <a href="https://github.com/sst/opencode">sst OpenCode</a> for my agentic AI work, which works well with our company-licensed models,
and fits my <code class="language-plaintext highlighter-rouge">tmux</code>-based workflow.</p>

<h2 id="how-i-use-zk-privately">How I use <code class="language-plaintext highlighter-rouge">zk</code> privately</h2>

<p>For private notes, I care about who can read them (AI or not).</p>

<p>Scenarios that kept happening</p>

<ul>
  <li>I’m in bed and see an interesting project I want to revisit later.</li>
  <li>I’m in the supermarket and need a shopping list or recipe.</li>
  <li>I’m doing taxes and can’t remember what I did last year.</li>
</ul>

<p>What I needed was the same thing as at work: searchable notes, but accessible on my phone and under my control.</p>

<p>I keep my private notes in a <code class="language-plaintext highlighter-rouge">Git</code> repository hosted on <a href="https://www.linode.com/">Linode</a>, accessed over SSH.
A private GitHub repository would also work, but I prefer not to have personal notes end up as training data for someone else’s models.</p>

<pre><code class="language-mermaid">flowchart LR

    subgraph Laptop["Laptop / Desktop"]
        LEditor["Editor"]
        LRepo["Notes (.git)"]
        LEditor --&gt; LRepo
    end

    subgraph Mobile["Mobile"]
        GitSync["Git Sync"]
        Obsidian["Obsidian"]
        MRepo["Notes (.git)"]
        GitSync --&gt; MRepo
        Obsidian --&gt; MRepo
    end

    Remote["Remote Repo&lt;br/&gt;(Linode)"]

    LRepo -- SSH --&gt; Remote
    MRepo -- SSH --&gt; Remote

</code></pre>

<p>With everything interconnected, the challenge of finding relevant information has largely become moot.
If I’m standing in the supermarket and need the grocery list for lasagne, I open it on my phone.
The important part isn’t mobile editing - It’s knowing that my notes are searchable and available wherever I am.
I can pick up the thread and continue, without trying to remember what past-me was thinking.</p>

<h2 id="conclusion">Conclusion</h2>

<ul>
  <li>You already have an editor open.</li>
  <li>You already write Markdown-like notes.</li>
</ul>

<p>So stop searching for the perfect app.
Put your notes in plain files.
Index them and search them with <code class="language-plaintext highlighter-rouge">zk</code>,
And make sure you can find them again.</p>

<h3 id="appendix-how-to-get-started">Appendix: How to get started</h3>

<p>Sold on the idea?
Following
<a href="https://zk-org.github.io/zk/">zk-org.github.io/zk</a>
we can easily set up <code class="language-plaintext highlighter-rouge">zk</code>.</p>

<h4 id="install">Install</h4>

<p>If you are on a mac, you can simply use brew.</p>

<div class="language-plaintext highlighter-rouge"><div class="highlight"><pre class="highlight"><code>brew install zk fzf ripgrep
</code></pre></div></div>

<p>If you are on linux or windows WSL2, you need to install the three dependencies with:</p>

<ul>
  <li><a href="https://junegunn.github.io/fzf/installation/">How to install fzf</a></li>
  <li><a href="https://github.com/BurntSushi/ripgrep?tab=readme-ov-file#installation">How to install ripgrep</a></li>
</ul>

<p>You can then compile <code class="language-plaintext highlighter-rouge">zk</code> by clone and <code class="language-plaintext highlighter-rouge">make</code>-ing it, with <a href="https://go.dev">go</a>.</p>

<div class="language-plaintext highlighter-rouge"><div class="highlight"><pre class="highlight"><code>cd $HOME/opt/
git clone https://github.com/zk-org/zk.git zk.git --depth 1
cd zk.git
make build
ln -s $HOME/opt/zk.git/zk $HOME/bin/zk
</code></pre></div></div>

<h4 id="setup">Setup</h4>

<p>With the executable installed, create a note folder <code class="language-plaintext highlighter-rouge">~/notes/</code> and <code class="language-plaintext highlighter-rouge">git init</code>.
Inside the folder create a <code class="language-plaintext highlighter-rouge">.zk</code> for your configuration and templates.
For me the setup is</p>

<div class="language-plaintext highlighter-rouge"><div class="highlight"><pre class="highlight"><code>.zk
.zk/templates
.zk/templates/todo.md
.zk/templates/default.md
.zk/templates/meeting.md
.zk/config.toml
.zk/.gitignore # ignore .sqlite
</code></pre></div></div>

<p>A template would look something like this</p>

<details>
  <summary><b>default_template.md</b></summary>

  <div class="language-plaintext highlighter-rouge"><div class="highlight"><pre class="highlight"><code>---
date: 
title: 
tags: [Untitled]
---

# Untitled

- Untitled
</code></pre></div>  </div>

</details>

<p>Why have “Untitled” in my template?
Because I sat up my editor <a href="https://github.com/neovim/neovim">Neovim</a> to jump through “Untitled”
so I can quickly <kbd>n</kbd><kbd>c</kbd><kbd>w</kbd> (next match, change word).</p>

<h4 id="configuration">Configuration</h4>

<p>My configuration for filename format, and other settings looks like;</p>

<details>
  <summary><b>config.toml</b></summary>

  <div class="language-plaintext highlighter-rouge"><div class="highlight"><pre class="highlight"><code>[note]
language = "en"
default-title = "Untitled"
filename = "-"
extension = "md"
template = "default.md"
id-charset = "alphanum"
id-length = 8
id-case = "lower"

[group]

[group.todo]
paths = ["todo"]

[group.todo.note]
filename = ""
extension = "md"
template = "todo.md"

[group.meeting]
paths = ["meetings"]

[group.meeting.note]
filename = "-"
extension = "md"
template = "meeting.md"

[format.markdown]
hashtags = true

[tool]
editor = "vim -c \"silent! /Untitled\" -c 'call search(\"Untitled\")' "
pager = "less -FIRX"
fzf-preview = "bat -p --color always {-1}"
fzf-options = "--multi --tiebreak begin --exact --tabstop 4 --height 100% --no-hscroll --color hl:-1,hl+:-1 --preview-window wrap"

[alias]

# Create new note, from templates
n = 'zk new'
today = 'zk new --group todo --no-input "$ZK_NOTEBOOK_DIR/todo" --template todo.md'
meeting = 'zk new --group meeting'
m = 'zk meeting'

# Usage:
# - zk todo next friday
# - zk todo tomorrow
# - zk todo yesterday
todo = 'zk new --group todo --no-input --date "$(date -d "$*" +%Y-%m-%d)" "$ZK_NOTEBOOK_DIR/todo" --template todo.md'

# Find and edit
last = "zk edit --limit 1 --sort modified- $argv"
recent = "zk edit --sort created- --created-after 'last 7 days' --interactive"
recent-month = "zk edit --sort created- --created-after 'last 30 days' --interactive"
ls = "zk edit --interactive --sort created"
t = "zk edit --interactive --tag $(zk tag --quiet | fzf | awk '{print $1}')"
ta = "zk edit --tag $(zk tag --quiet | fzf | awk '{print $1}')"

# Manage the notes
update = "cd $ZK_NOTEBOOK_DIR; git add -A; git commit -am 'updating'; git pull; git push; cd -"
clean = "zk-clean"
clean-dry = "zk-clean --dry-run"
sync = "zk update &amp;&amp; zk index"

# Find all unresolved tasks within a zk tag
open-tasks = "cd $ZK_NOTEBOOK_DIR; zk list --tag $(zk tag --quiet | fzf | awk '{print $1}') --format  --quiet | xargs rg --no-heading --with-filename -F '[ ]'"
</code></pre></div>  </div>

</details>

<p>Where noteable alias I’ve setup are</p>

<div class="language-plaintext highlighter-rouge"><div class="highlight"><pre class="highlight"><code># Use GNU date to interpret relative dates for todo lists. For example
# - zk todo
# - zk todo tomorrow
# - zk todo yesterday
# - zk todo next friday
# - zk todo 3 months 1 day
# - zk todo 25 dec
todo = 'zk new --group todo --no-input --date "$(date -d "$*" +%Y-%m-%d)" "$ZK_NOTEBOOK_DIR/todo" --template todo.md'

# Use fzf to interactively choose the tag I then want to search in
t = "zk edit --interactive --tag $(zk tag --quiet | fzf | awk '{print $1}')"

# Use git to pull and push, then re-index the zk database
update = "cd $ZK_NOTEBOOK_DIR; git add -A; git commit -am 'updating'; git pull; git push"
sync = "zk update &amp;&amp; zk index"

# Find all unresolved Markdown tasks within a zk tag, with fzf and ripgrep
open-tasks = "cd $ZK_NOTEBOOK_DIR; zk list --tag $(zk tag --quiet | fzf | awk '{print $1}') --format  --quiet | xargs rg --no-heading --with-filename -F '[ ]'"
</code></pre></div></div>

<h3 id="mobile-compatible-setup">Mobile Compatible Setup</h3>

<p>On your mobile install</p>

<ul>
  <li><a href="https://obsidian.md/mobile">obsidian.md/mobile</a></li>
  <li><a href="https://gitsync.viscouspotenti.al/">gitsync.viscouspotenti.al</a></li>
</ul>

<p>The setup is then, use GitSync to clone, pull, push the note git repository.
Then use Obsidian to search and edit Markdown.
GitSync can also be set up to auto-sync on Obsidian open/close.
Personally I found a manual usage worked fine.</p>

<p>For Obsidian Mobile configuration, ensure that “daily” format is the same as with <code class="language-plaintext highlighter-rouge">zk</code>, for both filename and directory.</p>

<div class="language-plaintext highlighter-rouge"><div class="highlight"><pre class="highlight"><code>Settings -&gt; Daily notes
- Change "Date format"
- Change "New file location"
- Check "Open daily note on startup", to auto open today's note
</code></pre></div></div>

<p>Tag and search will work out of the box.
The interface is somewhat clunky, but good enough.</p>

<h2 id="references">References</h2>

<ul>
  <li><a href="https://github.com/charnley/dotfiles">github.com/charnley/dotfiles</a> - my dotfile configuration</li>
  <li><a href="https://github.com/zk-org/zk.git">github.com/zk-org/zk.git</a> - the main tool to search your notes. <a href="https://zk-org.github.io/zk/tips/getting-started.html">Getting started with zk</a>.</li>
  <li><a href="https://obsidian.md/">Obsidian</a> - Overkill Zettelkasten-based note taking application</li>
  <li><a href="https://github.com/ViscousPot/GitSync">ViscousPot/GitSync</a> - Sync git repos on your phone.</li>
  <li>Sönke Ahren - <a href="https://www.soenkeahrens.de/en/takesmartnotes">How to Take Smart Notes</a> - this is not a recommendation, just a reference.</li>
  <li>Jeff Su - <a href="https://www.youtube.com/watch?v=oO9GLC2iKy8">Productivity System</a> - Video about doing todo-lists. Capture quickly, Organize clearly, Review frequently, Engange effectively.</li>
  <li><a href="https://forum.obsidian.md/t/setting-up-obsidian-git-on-ios-without-ish-or-working-copy/97800">Setting Up Obsidian Git on iOS</a> - alternative when having problem setting up Obsidian + Git Sync on iPhone</li>
</ul>]]></content><author><name>Jimmy</name></author><category term="notes" /><category term="programming" /><category term="zettelkasten" /><category term="notes" /><category term="programming" /><category term="zettelkasten" /><summary type="html"><![CDATA[tl;dr: My pitch is, you anyway write your notes in Markdown-like text files; why not index and search them with zk-org? I use Neovim, but the setup is editor agnostic. This is not overkill.]]></summary></entry><entry><title type="html">Building Your Own AI &amp;amp; E-Ink Powered Art Gallery: A Local DIY Guide</title><link href="https://charnley.github.io/blog/2025/04/02/e-ink-ai-esp32-local-art-gallery.html" rel="alternate" type="text/html" title="Building Your Own AI &amp;amp; E-Ink Powered Art Gallery: A Local DIY Guide" /><published>2025-04-02T00:00:00+00:00</published><updated>2025-04-02T00:00:00+00:00</updated><id>https://charnley.github.io/blog/2025/04/02/e-ink-ai-esp32-local-art-gallery</id><content type="html" xml:base="https://charnley.github.io/blog/2025/04/02/e-ink-ai-esp32-local-art-gallery.html"><![CDATA[<p><img src="/blog/assets/images/eink_art/photos/front_double_landscapes.jpg" alt="" /></p>

<p>We built an <strong>e-ink picture frame</strong> using an <strong>ESP32</strong> microprocessor that shows a new daily piece of artwork created by a <strong>local AI diffusion model</strong>.
Each day brings a random and unique image to enjoy. Everything runs on our local network, keeping everything private and off the cloud. It’s simple to have dynamic, AI-generated art on your walls without compromising privacy. Plus, the whole setup fits into our Home Assistant smart home system, which handles the image server and keeps track of the ESP32s.</p>

<p><img src="/blog/assets/images/eink_art/video/output2.gif" alt="
The transition of e-ink screen, lasting around 3sec
" /></p>

<table>
  <thead>
    <tr>
      <th>a</th>
      <th>b</th>
    </tr>
  </thead>
  <tbody>
    <tr>
      <td><img src="/blog/assets/images/eink_art/photos/front_fem.jpg" alt="" /></td>
      <td><img src="/blog/assets/images/eink_art/photos/backside_tape.jpg" alt="" /></td>
    </tr>
  </tbody>
</table>

<p><strong>Figure a:</strong> Art gallery with 5 e-ink screen synced with the same AI model and prompt. <strong>Figure b:</strong> The back side of the setup with ESP32 and battery.</p>

<h2 id="table-of-contents">Table of Contents</h2>
<ul>
  <li><a href="#want-to-build-your-own-heres-how">Want to build your own?</a></li>
  <li><a href="#hardware-requirements">Hardware Requirements</a></li>
  <li><a href="#softwareservice-overview">Software/Service Overview</a></li>
  <li><a href="#why-and-what-e-ink">Why and what E-ink?</a></li>
  <li><a href="#hosting-an-ai-art-model">Hosting an AI art model</a>
    <ul>
      <li><a href="#selecting-an-ai-model">Selecting an AI model</a></li>
      <li><a href="#image-prompts-for-best-results">Image Prompts for Best Results</a></li>
      <li><a href="#hosting-image-generator-service-on-windows">Hosting Image Generator Service on Windows</a></li>
    </ul>
  </li>
  <li><a href="#dithering-converting-grayscale-images-to-black-and-white">Dithering: Converting Grayscale Images to Black-and-White</a></li>
  <li><a href="#displaying-the-image">Displaying the image</a>
    <ul>
      <li><a href="#setting-up-raspberry-pi-api-frame">Setting up Raspberry Pi API frame</a></li>
      <li><a href="#setting-up-esphome-and-esp32-frame">Setting up ESPHome and ESP32 frame</a></li>
    </ul>
  </li>
  <li><a href="#battery-choice">Battery choice</a></li>
  <li><a href="#mounting-on-the-frame">Mounting on the frame</a></li>
  <li><a href="#the-result">The result</a></li>
  <li><a href="#note-on-the-next-version">Note on the next version</a></li>
  <li><a href="#thanks">Thanks</a></li>
</ul>

<h3 id="want-to-build-your-own-heres-how">Want to build your own? Here’s how.</h3>
<p>If you’re aiming for wireless picture frames, the ESP32 chip is the way to go, though it does require some soldering.
If you’d rather avoid the soldering, you can always use a Raspberry Pi Zero, leaving you with a cable coming out of your frame.</p>

<p>In some areas, we go all in (like with dithering algorithms), while in others, we take shortcuts (like writing yaml instead of C-code).
After all, <a href="https://www.youtube.com/watch?v=4jgTCayWlwc">we need to finish our projects</a>.</p>

<h2 id="hardware-requirements">Hardware Requirements</h2>

<p>Here’s what you’ll need:</p>

<ul>
  <li>A computer with a <strong>decent graphics card</strong> to generate AI images</li>
  <li>An <strong>E-ink screen</strong> and an E-ink screen HAT</li>
  <li>For wireless or battery-powered setups: an <strong>ESP32 chip</strong> and a LiPo battery</li>
  <li>For wired setups or if you don’t want to solder: a <strong>Raspberry Pi Zero</strong></li>
  <li>Optionally, a <strong>Raspberry Pi 5</strong> to host an image server</li>
</ul>

<p>And you should be comfortable with:</p>

<ul>
  <li>Python programming</li>
  <li>Basic Linux (shell) commands</li>
  <li>Soldering</li>
</ul>

<p>While a Raspberry Pi Zero is the best choice for the picture frame due to its size, any Raspberry Pi model will work just fine.
Specifiably, the items we got were:</p>

<table>
  <thead>
    <tr>
      <th>Item</th>
      <th>Product Link</th>
      <th>Price</th>
    </tr>
  </thead>
  <tbody>
    <tr>
      <td>DFRobot FireBeetle2 ESP32-S3 N16R8 8MB PSRAM <a href="https://wiki.dfrobot.com/SKU_DFR0975_FireBeetle_2_Board_ESP32_S3">wiki</a></td>
      <td><a href="https://www.dfrobot.com/product-2676.html">https://www.dfrobot.com/product-2676.html</a></td>
      <td>~ 20 EUR</td>
    </tr>
    <tr>
      <td>DFRobot FireBettle2 ESP32-E N16R2 2M PSRAM  <a href="https://wiki.dfrobot.com/_SKU_DFR1139_FireBeetle_2_ESP32_E_N16R2_IoT_Microcontroller">wiki</a></td>
      <td><a href="https://www.dfrobot.com/product-2837.html">https://www.dfrobot.com/product-2837.html</a></td>
      <td>~ 15 EUR</td>
    </tr>
    <tr>
      <td>1500-5000 mAh LiPo Battery with JST PH 2 Pin connector</td>
      <td> </td>
      <td>~ 7 EUR</td>
    </tr>
    <tr>
      <td>Raspberry Pi 5</td>
      <td><a href="https://www.raspberrypi.com/products/raspberry-pi-5/">https://www.raspberrypi.com/products/raspberry-pi-5/</a></td>
      <td>~120 EUR</td>
    </tr>
    <tr>
      <td>Raspberry Pi Zero</td>
      <td><a href="https://www.raspberrypi.com/products/raspberry-pi-zero/">https://www.raspberrypi.com/products/raspberry-pi-zero/</a></td>
      <td>~12 EUR</td>
    </tr>
    <tr>
      <td>Waveshare E-ink 13.3” K, with HAT</td>
      <td><a href="https://www.waveshare.com/13.3inch-e-paper-hat-k.htm">https://www.waveshare.com/13.3inch-e-paper-hat-k.htm</a></td>
      <td>~150 EUR</td>
    </tr>
  </tbody>
</table>

<p>The estimated total cost per ESP32-based frame is around 180 EUR, excluding the cost of the physical frame. The e-ink display is the most expensive component.</p>

<p>We chose ESP32 after browsing <a href="https://registry.platformio.org/platforms/platformio/espressif32/boards?version=5.3.0">this list of compatible devices on PlatformIO</a>.
The version is locked to 5.3.0 because, at the time of writing, ESPHome uses <code class="language-plaintext highlighter-rouge">platformio=5.3.0</code>.
The key requirement is that the ESPHome <a href="https://esphome.io/components/online_image.html"><code class="language-plaintext highlighter-rouge">online_image</code></a> component needs PSRAM to download the PNG image over Wi-Fi.</p>

<p>If you’re based in Switzerland, check out <a href="https://www.bastelgarage.ch">bastelgarage.ch</a>.
Otherwise, a local hobby electronics store in your country will likely carry most of the parts.
Unfortunately, we couldn’t find a supplier for the Waveshare 13.3” black/white e-ink display (<a href="https://amzn.to/4im9Wjj">Waveshare 13.3” black/white e-ink display</a>), so we ordered it from Amazon.</p>

<h2 id="softwareservice-overview">Software/Service Overview</h2>

<p>To keep everything organized and make the workflow easy to manage, we divided the tasks into three main sections:</p>
<ul>
  <li>generating images</li>
  <li>storing images</li>
  <li>displaying images</li>
</ul>

<p>We use our desktop computer with a graphics card to generate images on the fly or through a scheduled job.
We both created different versions of the workflow. You can check out Jimmy’s version at <a href="https://github.com/charnley/eink-art-gallery">github.com/charnley/eink-art-gallery</a>.</p>

<pre><code class="language-mermaid">graph LR

    subgraph Desktop [Desktop Computer]
      direction RL
      gpucron@{ shape: rounded, label: "Cron job" }
      GPU@{ shape: rounded, label: "GPU" }
      gpucron --&gt; GPU
    end

    subgraph HA [Home Assistant / Raspberry Pi]
      database@{ shape: db, label: "Image\n.sqlite" }
      canvasserver@{ shape: rounded, label: "Picture\nServer" }
      canvasserver --&gt; database
    end

    subgraph pictures [Picture Frames]

        subgraph esp32 [ESP32]
            esp32eink@{ shape: rounded, label: "E-Ink\nDisplay" }
        end
        subgraph rpi [Raspberry Pi Zero]
            rpieink@{ shape: rounded, label: "E-Ink\nDisplay" }
        end

    end

    canvasserver -- "POST image" --&gt; rpi
    esp32 -- GET image --&gt; canvasserver

    gpucron -- "GET status" --&gt; canvasserver
    gpucron -- POST image(s) --&gt; canvasserver
</code></pre>

<p>The workflow works like this:</p>

<ul>
  <li>The <strong>picture server</strong> holds a list of AI prompts, each with its associated images, stored in a SQLite database. For our setup, this is hosted on Home Assistant as an Add-on, but it could easily run on any Docker hosting service.</li>
  <li>Every night, the <strong>desktop computer</strong> checks the picture server for prompts that need images. For all of those prompts, the desktop computer generates new images and sends them to the server.</li>
  <li>The <strong>ESP32-powered picture frame(s)</strong> follow a sleep schedule, staying off for 24 hours and waking up at 4 am. When it wakes up, it requests a picture, displays it, and then goes back to sleep.</li>
  <li>The <strong>Raspberry Pi-powered picture frame(s)</strong> host an API for displaying images, so you can send live notifications or images directly to the frame.</li>
</ul>

<p>The services work seamlessly together and can be easily customized to fit personal needs.
Good separation of concern makes it easier to debug.</p>

<h2 id="why-and-what-e-ink">Why and what E-ink?</h2>

<p>There are two main reasons we chose e-ink: it looks like a drawing and consumes very little power. But beyond that, it just looks amazing and I’ve yet to meet anyone who realizes it’s screen technology without an explanation. And honestly, I’m always happy to provide that explanation.</p>

<p>What makes it look so realistic is that it’s using ink. You’ll know exactly what I mean if you’ve ever used a Kindle or a Remarkable Tablet. The screen comprises tiny “pixels” filled with oil and pigments. The pigments are moved up or down using an electromagnet, which determines the color of each pixel.</p>

<p>Want to learn more? Check out this Wikipedia page on E-Ink <a href="https://en.wikipedia.org/wiki/E_Ink">wikipedia.org/wiki/E_Ink</a> and this one on electronic paper <a href="https://en.wikipedia.org/wiki/Electronic_paper">wikipedia.org/wiki/Electronic_paper</a>.</p>

<p>Several providers are out there, but the E-ink supplier we’ve gone with is Waveshare. We chose them because others have had good experiences with their products, they offer solid documentation, and their prices are reasonable. In particular, we found the 13.3-inch black-and-white screen to be the perfect fit for our needs, especially when you consider the price versus size. You can check it out here
<a href="https://www.waveshare.com/13.3inch-e-paper-hat-k.htm">waveshare.com/13.3inch-e-paper-hat-k.htm</a>.</p>

<p>The prices can rise quickly as the screen size increases, but we didn’t want to go with the standard 7.5-inch screen—it would look way too small on the wall. We preferred to compromise and go with a larger, though lower-resolution, black-and-white screen. Even with its lower resolution, the 13.3-inch screen fits perfectly and blends seamlessly into our living rooms.</p>

<p>The screen operates via GPIO pins and binary commands. For the Raspberry Pi, it’s pretty much plug-and-play. For the ESP32, however, you’ll need to solder each pin and set up the GPIO configuration.</p>

<table>
  <thead>
    <tr>
      <th>PIN</th>
      <th>Description</th>
    </tr>
  </thead>
  <tbody>
    <tr>
      <td>VCC</td>
      <td>Power positive (3.3V power supply input)</td>
    </tr>
    <tr>
      <td>GND</td>
      <td>Ground</td>
    </tr>
    <tr>
      <td>DIN</td>
      <td>SPI’s MOSI, data input</td>
    </tr>
    <tr>
      <td>SCLK</td>
      <td>SPI’s CLK, clock signal input</td>
    </tr>
    <tr>
      <td>CS</td>
      <td>Chip selection, low active</td>
    </tr>
    <tr>
      <td>DC</td>
      <td>Data/Command, low for command, high for data</td>
    </tr>
    <tr>
      <td>RST</td>
      <td>Reset, low active</td>
    </tr>
    <tr>
      <td>BUSY</td>
      <td>Busy status output pin (indicating busy)</td>
    </tr>
    <tr>
      <td>PWR</td>
      <td>Power on/off control</td>
    </tr>
  </tbody>
</table>

<p>You can choose which pins go where in the soldering configuration, but VCC and GND are fixed.
The PWR pin is a recent addition to the HAT and controls the power for the E-ink screen. The easiest way to configure this is by soldering it directly to a 3.3 V endpoint on the ESP32.</p>

<p>Another reason we chose this brand of e-ink display is that ESPHome drivers are now available, making it much quicker to get everything up and running. Plus, plenty of examples are out there to help you get started. Mind you, most of these examples are for the 7.5-inch model.</p>

<blockquote>
  <p><strong>NOTE:</strong> We also explored the Black-White-Red E-ink display from Waveshare (<a href="https://www.waveshare.com/13.3inch-e-paper-hat-b.htm">13.3” E-Paper HAT-B</a>), but it required more effort to get it working with ESPHome. Additionally, it takes about 30 seconds to switch pictures, compared to just 3 seconds with the black-and-white version.</p>
</blockquote>

<h2 id="hosting-an-ai-art-model">Hosting an AI art model</h2>

<p>We set up a Python environment on our desktop computer to populate our local image library to access a graphics card/GPU.
While having a powerful graphics card isn’t crucial, it does make a difference if you want to generate live prompts.
However, it doesn’t matter if image generation takes 20 minutes or more for a nightly cron job.</p>

<h3 id="selecting-an-ai-model">Selecting an AI model</h3>

<p>You can choose any AI model you like here. We tried out many models throughout 2024, always experimenting with the latest ones, but in the end, it didn’t make a significant difference for this project.</p>

<p>We ultimately settled on 
<a href="https://stability.ai/news/introducing-stable-diffusion-3-5">Stable Diffusion 3.5</a>, because it was easy to set up and compatible with our hardware. On a NVIDIA GTX 1080p graphics card, it takes about 15 minutes per image, while with a NVIDIA GTX 4090, it only takes about 3 seconds. We used Huggingface to set up the model, which requires registration to access Stable Diffusion 3.</p>

<h3 id="image-prompts-for-best-results">Image Prompts for Best Results</h3>

<p>We’ve learned a few lessons about prompts.
The most important one is that if you want the art to look good on a black-and-white E-ink screen, you need to choose styles that work well in that format — think high contrast, grayscale, and, ideally, prompts with an artistic format (like paintings and drawings).</p>

<p>For example, if you prompt for something like “adventurous sci-fi structure, forest, Swiss Alps,” the diffusion model will likely default to a photorealistic style, which doesn’t translate well to e-ink. To get better results, you’ll need to add something like “pencil sketch” or “ink droplet style” to guide the model toward a look that fits the e-ink display. Anything related to drawing, painting, or sketching tends to work well.</p>

<p><img src="/blog/assets/images/eink_art/prompt_example.png" alt="
Showing the results of prompting &quot;winter forest in alps&quot;, without (a) and with (b) e-ink friendly keywords, and the results after dithering (c and d).
" /></p>

<p>Several style libraries are available for inspiration. We found <a href="https://midlibrary.io/">midlibrary.io</a> to offer a great selection of styles and artists that work well, especially in the black-and-white section. Some styles are more ethical than others, but as a non-commercial home project, we leave you to draw your own lines in the sand.</p>

<p>Below are some styles that work well with a motif, such as “simplistic line art, skier in Swiss Alps.”</p>

<details>
  <summary><b>Image prompt styles that work well on e-ink formats</b></summary>

  <div class="language-plaintext highlighter-rouge"><div class="highlight"><pre class="highlight"><code>simplistic line art
assembly drawing
brush pen drawing, white background
circut diagram
coloring book page, white background
coloring-in sheet, white background
elevation drawing
ink drawing, white background
one line art
one line, black and white, drawing
parametric drawing
pen drawing, white background
schematics
silhouette
stippling
sumi-e drawing, white background
wireframe
</code></pre></div>  </div>

</details>

<h3 id="hosting-image-generator-service-on-windows">Hosting Image Generator Service on Windows</h3>

<p>Since you’re following this setup guide, it’s assumed that you have a graphics card and are using a Windows machine.
The easiest way to set up the service is using Windows Subsystem for Linux (WSL).
There were some speed issues with Windows 10 and WSL2, mainly due to the disk’s slow read/write speeds.
However, using Windows 11 with WSL2 seems much more stable.
Just so you know, you’ll need more space than you might expect to set up the Linux subsystem.</p>

<p>With Windows 11 and WSL2, getting CUDA access to the Windows GPU from Linux is relatively smooth.
Here’s a setup guide to get started:</p>

<details>
  <summary><b>Setup Linux subsystem linux with CUDA</b></summary>

  <p>Install CUDA on Windows (you probably already have that) <a href="https://developer.nvidia.com/cuda-downloads">developer.nvidia.com/cuda-downloads</a></p>

  <p>Install WSL <a href="https://learn.microsoft.com/en-us/windows/wsl/install">learn.microsoft.com/en-us/windows/wsl/install</a></p>

  <p>Open PowerShell or Windows Command Prompt in <strong>administrator</strong> mode and install wsl</p>

  <div class="language-plaintext highlighter-rouge"><div class="highlight"><pre class="highlight"><code>wsl --install
</code></pre></div>  </div>

  <p>When WSL is installed, update and set up Linux (following the guide will install Ubuntu). You enter the Linux subsystem by</p>

  <div class="language-plaintext highlighter-rouge"><div class="highlight"><pre class="highlight"><code>wsl
</code></pre></div>  </div>

  <p>Then you can use Bash in Linux. First update your system;</p>

  <div class="language-plaintext highlighter-rouge"><div class="highlight"><pre class="highlight"><code># update apt
sudo apt update
sudo apt upgrade
</code></pre></div>  </div>

  <p>Download CUDA bridge from
<a href="https://developer.nvidia.com/cuda-downloads?target_os=Linux&amp;target_arch=x86_64&amp;Distribution=WSL-Ubuntu&amp;target_version=2.0&amp;target_type=deb_network">developer.nvidia.com/cuda-downloads?target_os=Linux&amp;target_arch=x86_64&amp;Distribution=WSL-Ubuntu&amp;target_version=2.0&amp;target_type=deb_network</a>
and select; Linux, x86, WSL-Ubuntu, 2.0, deb (network). As of writing, this means the following wget</p>

  <div class="language-bash highlighter-rouge"><div class="highlight"><pre class="highlight"><code>wget https://developer.download.nvidia.com/compute/cuda/repos/wsl-ubuntu/x86_64/cuda-keyring_1.1-1_all.deb
<span class="nb">sudo </span>dpkg <span class="nt">-i</span> cuda-keyring_1.1-1_all.deb
<span class="nb">sudo </span>apt update
<span class="nb">sudo </span>apt <span class="nt">-y</span> <span class="nb">install </span>cuda-toolkit-12-3
</code></pre></div>  </div>

  <p>Lastly, set up Python with <code class="language-plaintext highlighter-rouge">conda</code>, <code class="language-plaintext highlighter-rouge">uv</code>, or <code class="language-plaintext highlighter-rouge">pip</code>. We will assume you know how to do that. Then, you can set up any Python-based Huggingface model. The choice is yours.</p>

</details>

<p>This setup allows you to run a Python environment with CUDA in a Linux subsystem on Windows.
Once the Linux subsystem is set up, you can configure a job to run your service daily at 4 am.
To do this, use <code class="language-plaintext highlighter-rouge">crontab -e</code>on WSL and add the following syntax:</p>

<pre><code class="language-crontab">30 4 * * * cd ~/path/to/project &amp;&amp; start-service
</code></pre>

<blockquote>
  <p><strong>NOTE:</strong> WSL2 will shut down if no shell is running, so you’ll need to leave a terminal open on your machine.</p>
</blockquote>

<h2 id="dithering-converting-grayscale-images-to-black-and-white">Dithering: Converting Grayscale Images to Black-and-White</h2>

<p>When converting a grayscale image to black-and-white (binary), we lose subtle gray shades.
To handle this, dithering (or error diffusion) is used.
This technique helps simulate grayscale by spreading the error from converting a pixel to black or white across nearby pixels.
More details can be found <a href="https://en.wikipedia.org/wiki/Dither">en.wikipedia.org/wiki/Dither</a>.</p>

<p>The most common dithering method is <a href="https://en.wikipedia.org/wiki/Floyd%E2%80%93Steinberg_dithering">Floyd-Steinberg dithering</a>.
It calculates each pixel’s error (the difference between its gray value and black/white) and distributes it to surrounding pixels.
This creates the illusion of more shades and smoother transitions, even in a binary image.</p>

<p>Starting from the top-left corner and moving through each pixel, the error is diffused to neighboring pixels. If \(*\) represents the current pixel, the error is spread out like this:</p>

\[\begin{bmatrix}
         &amp;                                          &amp; *                                        &amp; \frac{\displaystyle 7}{\displaystyle 16} &amp; \ldots \\
  \ldots &amp; \frac{\displaystyle 3}{\displaystyle 16} &amp; \frac{\displaystyle 5}{\displaystyle 16} &amp; \frac{\displaystyle 1}{\displaystyle 16} &amp; \ldots \\
\end{bmatrix}\]

<p>However, in practice, the numerically correct method often produces an image that looks overly “grayish” because it creates dense black-and-white pixel patterns. While this is technically accurate, it doesn’t look as clean or sharp, especially on low-resolution displays.</p>

<p>Through experience, we found that the <a href="https://en.wikipedia.org/wiki/Atkinson_dithering">Atkinson Dithering</a> works much better for low-resolution images.
The difference is that Atkinson diffuses only part of the error, which helps avoid the harsh black-and-white patterns and leads to a cleaner, more visually pleasing result.</p>

<p>If \(*\) represents the current pixel, the error is spread out like this:</p>

\[\begin{bmatrix}
  &amp;  &amp; *  &amp; \frac{\displaystyle 1}{\displaystyle 8} &amp; \frac{\displaystyle 1}{\displaystyle 8} \\
  \ldots &amp; \frac{\displaystyle 1}{\displaystyle 8} &amp; \frac{\displaystyle 1}{\displaystyle 8} &amp; \frac{\displaystyle 1}{\displaystyle 8} &amp; \ldots \\
  \ldots &amp;  &amp; \frac{\displaystyle 1}{\displaystyle 8} &amp;  &amp; \ldots \\
\end{bmatrix}\]

<p>The result is that the image will have more concentrated pixel areas and higher contrast. This is evident in the following comparison:</p>

<p><img src="/blog/assets/images/eink_art/dithering_example.png" alt="
a) A grayscale image, b) dithering using Floyd-Steinberg, and c) using Atkinson Dithering.
" /></p>

<p>It might be subtle, but notice how (b) appears more grayish than (c).
This difference is much more noticeable on an actual, physical, low-res e-ink screen.</p>

<p>Atkinson dithering isn’t implemented in Pillow (yet), which only supports Floyd-Steinberg. Since the process involves many for-loops, Python isn’t the most efficient choice. However, using Numba (JIT), we can speed things up and quickly get a working solution. As seen in:</p>

<details>
  <summary><b>Atkinson Dithering Python Implementations</b></summary>

  <div class="language-python highlighter-rouge"><div class="highlight"><pre class="highlight"><code><span class="kn">import</span> <span class="nn">numpy</span> <span class="k">as</span> <span class="n">np</span>
<span class="kn">from</span> <span class="nn">numba</span> <span class="kn">import</span> <span class="n">jit</span>
<span class="kn">from</span> <span class="nn">PIL</span> <span class="kn">import</span> <span class="n">Image</span>

<span class="k">def</span> <span class="nf">atkinson_dither</span><span class="p">(</span><span class="n">image</span><span class="p">:</span> <span class="n">Image</span><span class="p">.</span><span class="n">Image</span><span class="p">)</span> <span class="o">-&gt;</span> <span class="n">Image</span><span class="p">.</span><span class="n">Image</span><span class="p">:</span>
    <span class="n">img</span> <span class="o">=</span> <span class="n">np</span><span class="p">.</span><span class="n">array</span><span class="p">(</span><span class="n">image</span><span class="p">.</span><span class="n">convert</span><span class="p">(</span><span class="s">"L"</span><span class="p">),</span> <span class="n">dtype</span><span class="o">=</span><span class="n">np</span><span class="p">.</span><span class="n">int32</span><span class="p">)</span>
    <span class="n">set_atkinson_dither_array</span><span class="p">(</span><span class="n">img</span><span class="p">)</span>
    <span class="k">return</span> <span class="n">Image</span><span class="p">.</span><span class="n">fromarray</span><span class="p">(</span><span class="n">np</span><span class="p">.</span><span class="n">uint8</span><span class="p">(</span><span class="n">img</span><span class="p">))</span>

<span class="o">@</span><span class="n">jit</span>
<span class="k">def</span> <span class="nf">set_atkinson_dither_array</span><span class="p">(</span><span class="n">img</span><span class="p">:</span> <span class="n">np</span><span class="p">.</span><span class="n">ndarray</span><span class="p">):</span>
    <span class="s">"""changes img array with atkinson dithering"""</span>

    <span class="n">low</span> <span class="o">=</span> <span class="mi">0</span>
    <span class="n">heigh</span> <span class="o">=</span> <span class="mi">255</span>

    <span class="n">frac</span> <span class="o">=</span> <span class="mi">8</span>  <span class="c1"># Atkinson constant
</span>    <span class="n">neighbours</span> <span class="o">=</span> <span class="n">np</span><span class="p">.</span><span class="n">array</span><span class="p">([[</span><span class="mi">1</span><span class="p">,</span> <span class="mi">0</span><span class="p">],</span> <span class="p">[</span><span class="mi">2</span><span class="p">,</span> <span class="mi">0</span><span class="p">],</span> <span class="p">[</span><span class="o">-</span><span class="mi">1</span><span class="p">,</span> <span class="mi">1</span><span class="p">],</span> <span class="p">[</span><span class="mi">0</span><span class="p">,</span> <span class="mi">1</span><span class="p">],</span> <span class="p">[</span><span class="mi">1</span><span class="p">,</span> <span class="mi">1</span><span class="p">],</span> <span class="p">[</span><span class="mi">0</span><span class="p">,</span> <span class="mi">2</span><span class="p">]])</span>
    <span class="n">threshold</span> <span class="o">=</span> <span class="n">np</span><span class="p">.</span><span class="n">zeros</span><span class="p">(</span><span class="mi">256</span><span class="p">,</span> <span class="n">dtype</span><span class="o">=</span><span class="n">np</span><span class="p">.</span><span class="n">int32</span><span class="p">)</span>
    <span class="n">threshold</span><span class="p">[</span><span class="mi">128</span><span class="p">:]</span> <span class="o">=</span> <span class="mi">255</span>
    <span class="n">height</span><span class="p">,</span> <span class="n">width</span> <span class="o">=</span> <span class="n">img</span><span class="p">.</span><span class="n">shape</span>
    <span class="k">for</span> <span class="n">y</span> <span class="ow">in</span> <span class="nb">range</span><span class="p">(</span><span class="n">height</span><span class="p">):</span>
        <span class="k">for</span> <span class="n">x</span> <span class="ow">in</span> <span class="nb">range</span><span class="p">(</span><span class="n">width</span><span class="p">):</span>
            <span class="n">old</span> <span class="o">=</span> <span class="n">img</span><span class="p">[</span><span class="n">y</span><span class="p">,</span> <span class="n">x</span><span class="p">]</span>
            <span class="n">old</span> <span class="o">=</span> <span class="n">np</span><span class="p">.</span><span class="nb">min</span><span class="p">(</span><span class="n">np</span><span class="p">.</span><span class="n">array</span><span class="p">([</span><span class="n">old</span><span class="p">,</span> <span class="mi">255</span><span class="p">]))</span>
            <span class="n">new</span> <span class="o">=</span> <span class="n">threshold</span><span class="p">[</span><span class="n">old</span><span class="p">]</span>
            <span class="n">err</span> <span class="o">=</span> <span class="p">(</span><span class="n">old</span> <span class="o">-</span> <span class="n">new</span><span class="p">)</span> <span class="o">//</span> <span class="n">frac</span>
            <span class="n">img</span><span class="p">[</span><span class="n">y</span><span class="p">,</span> <span class="n">x</span><span class="p">]</span> <span class="o">=</span> <span class="n">new</span>
            <span class="k">for</span> <span class="n">dx</span><span class="p">,</span> <span class="n">dy</span> <span class="ow">in</span> <span class="n">neighbours</span><span class="p">:</span>
                <span class="n">nx</span><span class="p">,</span> <span class="n">ny</span> <span class="o">=</span> <span class="n">x</span> <span class="o">+</span> <span class="n">dx</span><span class="p">,</span> <span class="n">y</span> <span class="o">+</span> <span class="n">dy</span>
                <span class="k">if</span> <span class="mi">0</span> <span class="o">&lt;=</span> <span class="n">nx</span> <span class="o">&lt;</span> <span class="n">width</span> <span class="ow">and</span> <span class="mi">0</span> <span class="o">&lt;=</span> <span class="n">ny</span> <span class="o">&lt;</span> <span class="n">height</span><span class="p">:</span>
                    <span class="c1"># Make sure that img set is between 0 and 255 (negative error could surpass the value)
</span>                    <span class="n">img_yx</span> <span class="o">=</span> <span class="n">img</span><span class="p">[</span><span class="n">ny</span><span class="p">,</span> <span class="n">nx</span><span class="p">]</span> <span class="o">+</span> <span class="n">err</span>
                    <span class="n">img_yx</span> <span class="o">=</span> <span class="n">np</span><span class="p">.</span><span class="n">minimum</span><span class="p">(</span><span class="n">heigh</span><span class="p">,</span> <span class="n">np</span><span class="p">.</span><span class="n">maximum</span><span class="p">(</span><span class="n">img_yx</span><span class="p">,</span> <span class="n">low</span><span class="p">))</span>
                    <span class="n">img</span><span class="p">[</span><span class="n">ny</span><span class="p">,</span> <span class="n">nx</span><span class="p">]</span> <span class="o">=</span> <span class="n">img_yx</span>
</code></pre></div>  </div>

</details>

<blockquote>
  <p><strong>NOTE:</strong> If you’re working with multiple colors, you can diffuse the error for each color channel. You can also extend error diffusion to handle multiple levels of gray, not just black and white. Examples can be found in the GitHub repo.</p>
</blockquote>

<h2 id="displaying-the-image">Displaying the image</h2>

<p>We have two options for displaying the image on the e-ink: push with a power cable or pull with a battery.</p>

<p>The first iteration was done with a Raspberry Pi, but because it required a USB power cable, it removed the immersion as a photo frame.
Note that a white USB cable was used, and only one person ever noticed it. However, we knew it was there, and that was enough.
But if you want live updates, like notifications, this is the option you want.</p>

<p>The second option uses an ESP32 microprocessor, which can be battery-powered with no visible cords.</p>

<h3 id="setting-up-raspberry-pi-api-frame">Setting up Raspberry Pi API frame</h3>

<p>For the Raspberry Pi, the simplest setup would be to set up a FastAPI Python client to receive requests and display them.
We use an <a href="https://www.raspberrypi.com/products/raspberry-pi-zero/">Raspberry Pi Zero</a> because of the small form factor to be hidden behind the frame.
Waveshare provides quite good example codes for Python (and other implementations) and is easily the fastest way to get something displayed on your screen.
<a href="https://github.com/waveshareteam/e-Paper">github.com/waveshareteam/e-Paper</a>.</p>

<p>For the Raspberry Pi, <a href="https://www.raspberrypi.com/documentation/computers/getting-started.html">install Debian OS</a> and <code class="language-plaintext highlighter-rouge">ssh</code> into it.</p>

<details>
  <summary><b>Setting up Raspberry Pi</b></summary>

  <div class="language-bash highlighter-rouge"><div class="highlight"><pre class="highlight"><code><span class="c"># Enable SPI</span>
<span class="c"># Choose Interfacing Options -&gt; SPI -&gt; Yes</span>
<span class="nb">sudo </span>raspi-config
<span class="nb">sudo </span>reboot

<span class="c"># Setup Python and dependencies</span>
<span class="nb">sudo </span>apt <span class="nb">install </span>python3-pip python3-setuptools python3-venv python3-wheel libopenjp2-7

<span class="c"># Create a python env</span>
python3 <span class="nt">-m</span> venv project_name

<span class="c"># Activate python env</span>
<span class="nb">source</span> ./project_name/bin/activate

<span class="c"># Install the main dependencies with the activated env, but really, use a git repo for this</span>
pip <span class="nb">install </span>pillow numpy RPi.GPIO spidev gpiozero spidev
</code></pre></div>  </div>
</details>

<p>If you have a problem creating a <code class="language-plaintext highlighter-rouge">venv</code>, because of missing pip, you can;</p>

<div class="language-plaintext highlighter-rouge"><div class="highlight"><pre class="highlight"><code>python3 -m venv --without-pip project_name
source env/bin/activate
wget bootstrap.pypa.io/get-pip.py
python get-pip.py
</code></pre></div></div>

<p>With this setup, setting up a FastAPI solution to display images should be straightforward.
For inspiration, you can refer to Jimmy’s github solution <a href="https://github.com/charnley/eink-art-gallery">github.com/charnley/eink-art-gallery</a>.</p>

<p>Note, because you need to start the API every time the Raspberry Pi is booted, it is worth setting up a <code class="language-plaintext highlighter-rouge">crontab -e</code> to start you service at boot</p>

<div class="language-plaintext highlighter-rouge"><div class="highlight"><pre class="highlight"><code>@reboot /path/to/your_script.sh
</code></pre></div></div>

<h3 id="setting-up-esphome-and-esp32-frame">Setting up ESPHome and ESP32 frame</h3>

<p>Why use <code class="language-plaintext highlighter-rouge">YAML</code> instead of <code class="language-plaintext highlighter-rouge">C</code>? At some point, the project needs to end. We opted for ESPHome <code class="language-plaintext highlighter-rouge">YAML</code> , as we both use Home Assistant, and it made sense to leverage the convenience of ESPHome to get all the free features right out of the box. Sometimes, it’s best to choose your battles and focus on completing the project.</p>

<p>ESPHome is a YAML-based configuration that generates the binaries needed to flash devices. Rather than writing  code, you configure devices by setting up modules in YAML format. It’s a bit like building with Lego blocks for your ESP32 devices.
While the ESPHome ecosystem includes drivers for most WaveShare E-Ink displays, we encountered a gap. Specifically, the driver for the 13.3” black-and-white display we wanted to use wasn’t available. So, Peter took the initiative and wrote the necessary drivers, which you can find in
<a href="https://github.com/esphome/esphome/pull/6443">github.com/esphome/esphome/pull/6443</a></p>

<p>There are an overwhelming number of ESP32 options. Initially, we tried the Waveshare ESP32 development board, which can display images.
<a href="https://www.waveshare.com/e-paper-esp32-driver-board.htm">waveshare.com/e-paper-esp32-driver-board.htm</a>.
However, we ran into an issue: the standard ESPHome <a href="https://esphome.io/components/online_image.html">component</a> couldn’t download images over the Internet. This functionality requires <a href="https://docs.espressif.com/projects/esp-idf/en/latest/esp32/api-guides/external-ram.html">PSRAM</a> on the ESP32.</p>

<p>After testing a few options, we found that the <a href="https://wiki.dfrobot.com/_SKU_DFR1139_FireBeetle_2_ESP32_E_N16R2_IoT_Microcontroller">FireBettle2 ESP32-E</a> and <a href="https://wiki.dfrobot.com/SKU_DFR0975_FireBeetle_2_Board_ESP32_S3">FireBettle2 ESP32-S3</a> feature PSRAM and are well-documented by the manufacturer. These models turned out to be reliable choices for our project.</p>

<p>To connect the ESP32 to the <a href="https://www.waveshare.com/wiki/E-Paper_Driver_HAT">E-Paper Driver HAT</a>, you’ll need to map the GPIO pins on the ESP32 to those defined by the Waveshare HAT. The soldering process is straightforward. For your reference, we’ve provided an example configuration for the FireBettle 2 ESP32-E GPIO-to-Waveshare HAT GPIO pin mapping in the table below:</p>

<table>
  <thead>
    <tr>
      <th>WS HAT PIN</th>
      <th>ESP32-E PIN</th>
      <th>Description</th>
    </tr>
  </thead>
  <tbody>
    <tr>
      <td>PWR</td>
      <td>3v3</td>
      <td>Power on/off control</td>
    </tr>
    <tr>
      <td>BUSY</td>
      <td>4/D12</td>
      <td>Busy status output pin (indicating busy)</td>
    </tr>
    <tr>
      <td>RST</td>
      <td>14/D6</td>
      <td>Reset, low active</td>
    </tr>
    <tr>
      <td>DC</td>
      <td>13/D7</td>
      <td>Data/Command, low for command, high for data</td>
    </tr>
    <tr>
      <td>CS</td>
      <td>15/A4</td>
      <td>Chip selection, low active</td>
    </tr>
    <tr>
      <td>CLK</td>
      <td>18/SCK</td>
      <td>SPI’s CLK, clock signal input</td>
    </tr>
    <tr>
      <td>DIN</td>
      <td>23/MOSI</td>
      <td>SPI’s MOSI, data input</td>
    </tr>
    <tr>
      <td>GND</td>
      <td>GND</td>
      <td>Ground</td>
    </tr>
    <tr>
      <td>VCC</td>
      <td>3v3</td>
      <td>Power positive (3.3V power supply input)</td>
    </tr>
  </tbody>
</table>

<p>The configuration that worked for us with the FireBettle2 ESP32-E and FireBettle2 ESP32-S3 boards is as follows (as defined by the ESPHome substitutions in the YAML file). Keep in mind that GPIO pins often have multiple names. You’ll need to consult the manufacturer’s documentation to identify the physical GPIO pin on the ESP32. In this case, FireBettle provides detailed wikis, which are great resources for getting the pin mappings correct.</p>

<p>The example below assumes you’ve set up an add-on/Docker service within Home Assistant. However, the URL can be anything accessible on your local network, as long as the payload is a PNG image with the correct resolution. For the 13.3” K model, the required resolution is 960x680 pixels.</p>

<details>
  <summary><b>GPIO Configuration for FireBettle2 ESP32-E</b></summary>

  <div class="language-yaml highlighter-rouge"><div class="highlight"><pre class="highlight"><code><span class="na">substitutions</span><span class="pi">:</span>
  <span class="na">device_id</span><span class="pi">:</span> <span class="s2">"</span><span class="s">example_e"</span>
  <span class="na">wifi_ssid</span><span class="pi">:</span> <span class="kt">!secret</span> <span class="s">wifi_ssid</span>
  <span class="na">wifi_password</span><span class="pi">:</span> <span class="kt">!secret</span> <span class="s">wifi_password</span>
  <span class="na">wake_up_time</span><span class="pi">:</span> <span class="s2">"</span><span class="s">04:00:00"</span>
  <span class="na">image_url</span><span class="pi">:</span> <span class="s2">"</span><span class="s">http://homeassistant.local:8090/displays/queue.png"</span>

  <span class="na">busy_pin</span><span class="pi">:</span> <span class="s2">"</span><span class="s">GPIO04"</span> <span class="c1"># 4/D12</span>
  <span class="na">reset_pin</span><span class="pi">:</span> <span class="s2">"</span><span class="s">GPIO14"</span> <span class="c1"># 14/D6</span>
  <span class="na">dc_pin</span><span class="pi">:</span> <span class="s2">"</span><span class="s">GPIO13"</span> <span class="c1"># 13/D7</span>
  <span class="na">cs_pin</span><span class="pi">:</span> <span class="s2">"</span><span class="s">GPIO15"</span> <span class="c1"># 15/A4</span>
  <span class="na">clk_pin</span><span class="pi">:</span> <span class="s2">"</span><span class="s">GPIO18"</span> <span class="c1">#  18/SCK</span>
  <span class="na">mosi_pin</span><span class="pi">:</span> <span class="s2">"</span><span class="s">GPIO23"</span> <span class="c1"># 23/MOSI</span>

  <span class="na">waveshare_model</span><span class="pi">:</span> <span class="s2">"</span><span class="s">13.3in-k"</span> <span class="c1"># or another waveshare model</span>

<span class="na">esp32</span><span class="pi">:</span>
  <span class="na">board</span><span class="pi">:</span> <span class="s">esp32dev</span> <span class="c1"># dfrobot_firebeetle2_esp32e</span>
  <span class="na">framework</span><span class="pi">:</span>
    <span class="na">type</span><span class="pi">:</span> <span class="s">arduino</span>
    <span class="na">version</span><span class="pi">:</span> <span class="s">recommended</span>

<span class="na">esphome</span><span class="pi">:</span>
  <span class="na">name</span><span class="pi">:</span> <span class="s">eink-frame-${device_id}</span>
  <span class="na">friendly_name</span><span class="pi">:</span> <span class="s2">"</span><span class="s">eink</span><span class="nv"> </span><span class="s">frame</span><span class="nv"> </span><span class="s">${device_id}"</span>
  <span class="na">platformio_options</span><span class="pi">:</span>
    <span class="na">build_flags</span><span class="pi">:</span> <span class="s2">"</span><span class="s">-DBOARD_HAS_PSRAM"</span>
</code></pre></div>  </div>

</details>

<details>
  <summary><b>GPIO Configuration for FireBettle2 ESP3S3</b></summary>

  <div class="language-yaml highlighter-rouge"><div class="highlight"><pre class="highlight"><code><span class="na">substitutions</span><span class="pi">:</span>
  <span class="na">device_id</span><span class="pi">:</span> <span class="s2">"</span><span class="s">example_s"</span>
  <span class="na">wifi_ssid</span><span class="pi">:</span> <span class="kt">!secret</span> <span class="s">wifi_ssid</span>
  <span class="na">wifi_password</span><span class="pi">:</span> <span class="kt">!secret</span> <span class="s">wifi_password</span>
  <span class="na">wake_up_time</span><span class="pi">:</span> <span class="s2">"</span><span class="s">04:00:00"</span>
  <span class="na">image_url</span><span class="pi">:</span> <span class="s2">"</span><span class="s">http://homeassistant.local:8090/displays/queue.png"</span>

  <span class="na">clk_pin</span><span class="pi">:</span> <span class="s2">"</span><span class="s">GPIO12"</span>
  <span class="na">mosi_pin</span><span class="pi">:</span> <span class="s2">"</span><span class="s">GPIO11"</span>
  <span class="na">cs_pin</span><span class="pi">:</span> <span class="s2">"</span><span class="s">GPIO10"</span>
  <span class="na">dc_pin</span><span class="pi">:</span> <span class="s2">"</span><span class="s">GPIO9"</span>
  <span class="na">busy_pin</span><span class="pi">:</span> <span class="s2">"</span><span class="s">GPIO7"</span>
  <span class="na">reset_pin</span><span class="pi">:</span> <span class="s2">"</span><span class="s">GPIO4"</span>

  <span class="na">waveshare_model</span><span class="pi">:</span> <span class="s2">"</span><span class="s">13.3in-k"</span> <span class="c1"># or another waveshare model</span>

<span class="na">esp32</span><span class="pi">:</span>
  <span class="na">board</span><span class="pi">:</span> <span class="s">dfrobot_firebeetle2_esp32s3</span>
  <span class="na">framework</span><span class="pi">:</span>
    <span class="na">type</span><span class="pi">:</span> <span class="s">arduino</span>
    <span class="na">version</span><span class="pi">:</span> <span class="s">recommended</span>
</code></pre></div>  </div>

</details>

<p>Once you’ve soldered the ESP32 with connectors, it’s time to bring it to life by flashing it with ESPHome. To set up ESPHome, you’ll need a Python environment. Install ESPHome via pip to get started.</p>

<div class="language-bash highlighter-rouge"><div class="highlight"><pre class="highlight"><code>pip <span class="nb">install </span>esphome
</code></pre></div></div>

<p>Next, set up a <code class="language-plaintext highlighter-rouge">secrets.yaml</code> file with your Wi-Fi name and password.</p>

<div class="language-yaml highlighter-rouge"><div class="highlight"><pre class="highlight"><code><span class="na">wifi_ssid</span><span class="pi">:</span> <span class="s">YourWiFiSSID</span>
<span class="na">wifi_password</span><span class="pi">:</span> <span class="s">YourWiFiPassword</span>
</code></pre></div></div>

<p>Once the setup is complete, flash the ESP32 with ESPHome using the following command:</p>

<div class="language-bash highlighter-rouge"><div class="highlight"><pre class="highlight"><code>esphome run <span class="nt">--device</span> /dev/ttyACM0 ./path/to/configuration.yaml
</code></pre></div></div>

<p>The device will be mounted on <code class="language-plaintext highlighter-rouge">/dev/ttyACM0</code> or <code class="language-plaintext highlighter-rouge">/dev/ttyUSB0</code>, with the number (0-2) indicating the specific device.
Be sure to define the device argument when flashing; otherwise, ESPHome will attempt to flash over Ethernet using the device name.</p>

<p>With the GPIO soldered and configured, you can now experiment with different ESPHome configurations.
Combine the device-specific substitutions above with the following functionality.
We’ve included two example configurations that helped us debug. For more, check out our GitHub project.</p>

<p>Here’s a simple yaml configuration to connect to Wi-Fi, download an image, display it, and sleep for 24 hours. The variables are defined as substitutions above.</p>

<div class="language-yaml highlighter-rouge"><div class="highlight"><pre class="highlight"><code><span class="na">http_request</span><span class="pi">:</span>
  <span class="na">id</span><span class="pi">:</span> <span class="s">fetch_image_request</span>
  <span class="na">timeout</span><span class="pi">:</span> <span class="s">5s</span>
  <span class="na">useragent</span><span class="pi">:</span> <span class="s">esphome/example_device</span>
  <span class="na">verify_ssl</span><span class="pi">:</span> <span class="no">false</span>

<span class="na">wifi</span><span class="pi">:</span>
  <span class="na">ssid</span><span class="pi">:</span> <span class="kt">!secret</span> <span class="s">wifi_ssid</span>
  <span class="na">password</span><span class="pi">:</span> <span class="kt">!secret</span> <span class="s">wifi_password</span>
  <span class="na">on_connect</span><span class="pi">:</span>
    <span class="pi">-</span> <span class="na">component.update</span><span class="pi">:</span> <span class="s">my_image</span>

<span class="na">logger</span><span class="pi">:</span>
  <span class="na">baud_rate</span><span class="pi">:</span> <span class="m">115200</span>
  <span class="na">level</span><span class="pi">:</span> <span class="s">VERY_VERBOSE</span>

<span class="na">online_image</span><span class="pi">:</span>
  <span class="pi">-</span> <span class="na">url</span><span class="pi">:</span> <span class="s">$image_url</span>
    <span class="na">id</span><span class="pi">:</span> <span class="s">my_image</span>
    <span class="na">format</span><span class="pi">:</span> <span class="s">png</span>
    <span class="na">type</span><span class="pi">:</span> <span class="s">BINARY</span>
    <span class="na">on_download_finished</span><span class="pi">:</span>
      <span class="na">then</span><span class="pi">:</span>
        <span class="pi">-</span> <span class="na">component.update</span><span class="pi">:</span> <span class="s">my_display</span>
        <span class="pi">-</span> <span class="na">logger.log</span><span class="pi">:</span> <span class="s2">"</span><span class="s">Downloaded</span><span class="nv"> </span><span class="s">image"</span>
    <span class="na">on_error</span><span class="pi">:</span>
      <span class="na">then</span><span class="pi">:</span>
        <span class="pi">-</span> <span class="na">logger.log</span><span class="pi">:</span> <span class="s2">"</span><span class="s">Error</span><span class="nv"> </span><span class="s">downloading</span><span class="nv"> </span><span class="s">image"</span>

<span class="na">spi</span><span class="pi">:</span>
  <span class="na">clk_pin</span><span class="pi">:</span> <span class="s">$clk_pin</span>
  <span class="na">mosi_pin</span><span class="pi">:</span> <span class="s">$mosi_pin</span>

<span class="na">display</span><span class="pi">:</span>
  <span class="pi">-</span> <span class="na">platform</span><span class="pi">:</span> <span class="s">waveshare_epaper</span>
    <span class="na">id</span><span class="pi">:</span> <span class="s">my_display</span>
    <span class="na">cs_pin</span><span class="pi">:</span> <span class="s">$cs_pin</span>
    <span class="na">dc_pin</span><span class="pi">:</span> <span class="s">$dc_pin</span>
    <span class="na">busy_pin</span><span class="pi">:</span> <span class="s">$busy_pin</span>
    <span class="na">reset_pin</span><span class="pi">:</span> <span class="s">$reset_pin</span>
    <span class="na">reset_duration</span><span class="pi">:</span> <span class="s">200ms</span>
    <span class="na">model</span><span class="pi">:</span> <span class="s">$waveshare_model</span>
    <span class="na">update_interval</span><span class="pi">:</span> <span class="s">never</span>
    <span class="na">lambda</span><span class="pi">:</span> <span class="pi">|-</span>
      <span class="s">it.image(0, 0, id(my_image), Color::BLACK, Color::WHITE);</span>
      <span class="s">ESP_LOGD("display", "Image displayed successfully");</span>

<span class="na">deep_sleep</span><span class="pi">:</span>
  <span class="na">run_duration</span><span class="pi">:</span> <span class="s">40s</span>
  <span class="na">sleep_duration</span><span class="pi">:</span> <span class="s">25200s</span> <span class="c1"># 7h</span>
</code></pre></div></div>

<p>For a more advanced configuration that:</p>

<ul>
  <li>Wakes up at 4 am</li>
  <li>Connects to Wi-Fi</li>
  <li>Attempts to download an image</li>
  <li>Displays an “X” if the image download fails</li>
  <li>Displays the image on success</li>
  <li>Send an estimate of the battery level to Home Assistant</li>
</ul>

<p>The configuration would look like the following yaml.</p>

<details>
  <summary><b>Advanced ESPHome configuration</b></summary>

  <div class="language-yaml highlighter-rouge"><div class="highlight"><pre class="highlight"><code><span class="na">deep_sleep</span><span class="pi">:</span>
  <span class="na">id</span><span class="pi">:</span> <span class="s">deep_sleep_control</span>
  <span class="na">run_duration</span><span class="pi">:</span> <span class="s">40sec</span>

<span class="na">time</span><span class="pi">:</span>
  <span class="pi">-</span> <span class="na">platform</span><span class="pi">:</span> <span class="s">homeassistant</span>
    <span class="na">id</span><span class="pi">:</span> <span class="s">homeassistant_time</span>

<span class="na">logger</span><span class="pi">:</span>
  <span class="na">baud_rate</span><span class="pi">:</span> <span class="m">115200</span>
  <span class="na">level</span><span class="pi">:</span> <span class="s">DEBUG</span>

<span class="na">wifi</span><span class="pi">:</span>
  <span class="na">ssid</span><span class="pi">:</span> <span class="kt">!secret</span> <span class="s">wifi_ssid</span>
  <span class="na">password</span><span class="pi">:</span> <span class="kt">!secret</span> <span class="s">wifi_password</span>
  <span class="na">power_save_mode</span><span class="pi">:</span> <span class="s">light</span>
  <span class="na">on_connect</span><span class="pi">:</span>
    <span class="pi">-</span> <span class="na">logger.log</span><span class="pi">:</span> <span class="s">WiFi is connected!</span>
    <span class="pi">-</span> <span class="na">logger.log</span><span class="pi">:</span> <span class="s2">"</span><span class="s">Trying</span><span class="nv"> </span><span class="s">to</span><span class="nv"> </span><span class="s">download</span><span class="nv"> </span><span class="s">${image_url}"</span>
    <span class="pi">-</span> <span class="na">component.update</span><span class="pi">:</span> <span class="s">my_image</span>

<span class="na">captive_portal</span><span class="pi">:</span>

<span class="na">online_image</span><span class="pi">:</span>
  <span class="pi">-</span> <span class="na">url</span><span class="pi">:</span> <span class="s">$image_url</span>
    <span class="na">id</span><span class="pi">:</span> <span class="s">my_image</span>
    <span class="na">format</span><span class="pi">:</span> <span class="s">png</span>
    <span class="na">type</span><span class="pi">:</span> <span class="s">BINARY</span>
    <span class="na">on_download_finished</span><span class="pi">:</span>
      <span class="na">then</span><span class="pi">:</span>
        <span class="pi">-</span> <span class="na">logger.log</span><span class="pi">:</span> <span class="s2">"</span><span class="s">Downloaded</span><span class="nv"> </span><span class="s">image,</span><span class="nv"> </span><span class="s">updating</span><span class="nv"> </span><span class="s">display"</span>
        <span class="pi">-</span> <span class="na">display.page.show</span><span class="pi">:</span> <span class="s">page1</span>
        <span class="pi">-</span> <span class="na">component.update</span><span class="pi">:</span> <span class="s">my_display</span>
        <span class="pi">-</span> <span class="na">delay</span><span class="pi">:</span> <span class="s">7s</span>
        <span class="pi">-</span> <span class="na">deep_sleep.enter</span><span class="pi">:</span>
            <span class="na">id</span><span class="pi">:</span> <span class="s">deep_sleep_control</span>
            <span class="na">until</span><span class="pi">:</span> <span class="s2">"</span><span class="s">${wake_up_time}"</span>
            <span class="na">time_id</span><span class="pi">:</span> <span class="s">homeassistant_time</span>
    <span class="na">on_error</span><span class="pi">:</span>
      <span class="na">then</span><span class="pi">:</span>
        <span class="pi">-</span> <span class="na">logger.log</span><span class="pi">:</span> <span class="s2">"</span><span class="s">Error</span><span class="nv"> </span><span class="s">downloading</span><span class="nv"> </span><span class="s">image</span><span class="nv"> </span><span class="s">$(image_url)"</span>
        <span class="pi">-</span> <span class="na">display.page.show</span><span class="pi">:</span> <span class="s">page2</span>
        <span class="pi">-</span> <span class="na">component.update</span><span class="pi">:</span> <span class="s">my_display</span>
        <span class="pi">-</span> <span class="na">delay</span><span class="pi">:</span> <span class="s">7s</span>
        <span class="pi">-</span> <span class="na">deep_sleep.enter</span><span class="pi">:</span>
            <span class="na">id</span><span class="pi">:</span> <span class="s">deep_sleep_control</span>
            <span class="na">until</span><span class="pi">:</span> <span class="s2">"</span><span class="s">${wake_up_time}"</span>
            <span class="na">time_id</span><span class="pi">:</span> <span class="s">homeassistant_time</span>

<span class="na">spi</span><span class="pi">:</span>
  <span class="na">clk_pin</span><span class="pi">:</span> <span class="s">$clk_pin</span>
  <span class="na">mosi_pin</span><span class="pi">:</span> <span class="s">$mosi_pin</span>

<span class="na">display</span><span class="pi">:</span>
  <span class="pi">-</span> <span class="na">platform</span><span class="pi">:</span> <span class="s">waveshare_epaper</span>
    <span class="na">id</span><span class="pi">:</span> <span class="s">my_display</span>
    <span class="na">cs_pin</span><span class="pi">:</span> <span class="s">$cs_pin</span>
    <span class="na">dc_pin</span><span class="pi">:</span> <span class="s">$dc_pin</span>
    <span class="na">busy_pin</span><span class="pi">:</span> <span class="s">$busy_pin</span>
    <span class="na">reset_pin</span><span class="pi">:</span> <span class="s">$reset_pin</span>
    <span class="na">reset_duration</span><span class="pi">:</span> <span class="s">200ms</span>
    <span class="na">model</span><span class="pi">:</span> <span class="s">$waveshare_model</span>
    <span class="na">update_interval</span><span class="pi">:</span> <span class="s">never</span>
    <span class="na">pages</span><span class="pi">:</span>
      <span class="pi">-</span> <span class="na">id</span><span class="pi">:</span> <span class="s">page1</span>
        <span class="na">lambda</span><span class="pi">:</span> <span class="pi">|-</span>
          <span class="s">it.image(0, 0, id(my_image), Color::BLACK, Color::WHITE);</span>
          <span class="s">ESP_LOGD("display", "Image displayed successfully");</span>
      <span class="pi">-</span> <span class="na">id</span><span class="pi">:</span> <span class="s">page2</span>
        <span class="na">lambda</span><span class="pi">:</span> <span class="pi">|-</span>
          <span class="s">it.line(0, 0, 50, 50);</span>
          <span class="s">it.line(0, 50, 50, 0);</span>
          <span class="s">ESP_LOGD("display", "Error Image displayed successfully");</span>

<span class="na">api</span><span class="pi">:</span>
   <span class="na">on_client_connected</span><span class="pi">:</span>
     <span class="na">then</span><span class="pi">:</span>
       <span class="pi">-</span> <span class="na">sensor.template.publish</span><span class="pi">:</span>
           <span class="na">id</span><span class="pi">:</span> <span class="s">battery_level</span>
           <span class="na">state</span><span class="pi">:</span> <span class="kt">!lambda</span> <span class="s2">"</span><span class="s">return</span><span class="nv"> </span><span class="s">id(battery_level).state;"</span>
       <span class="pi">-</span> <span class="na">sensor.template.publish</span><span class="pi">:</span>
           <span class="na">id</span><span class="pi">:</span> <span class="s">battery_voltage</span>
           <span class="na">state</span><span class="pi">:</span> <span class="kt">!lambda</span> <span class="s2">"</span><span class="s">return</span><span class="nv"> </span><span class="s">id(battery_voltage).state;"</span>

<span class="na">ota</span><span class="pi">:</span>
  <span class="pi">-</span> <span class="na">platform</span><span class="pi">:</span> <span class="s">esphome</span>

 <span class="na">sensor</span><span class="pi">:</span>
   <span class="pi">-</span> <span class="na">platform</span><span class="pi">:</span> <span class="s">adc</span>
     <span class="na">pin</span><span class="pi">:</span> <span class="s">VDD</span>
     <span class="na">name</span><span class="pi">:</span> <span class="s2">"</span><span class="s">Battery</span><span class="nv"> </span><span class="s">Voltage"</span>
     <span class="na">id</span><span class="pi">:</span> <span class="s">battery_voltage</span>
     <span class="na">update_interval</span><span class="pi">:</span> <span class="s">60s</span>
     <span class="na">attenuation</span><span class="pi">:</span> <span class="s">auto</span>
     <span class="na">unit_of_measurement</span><span class="pi">:</span> <span class="s2">"</span><span class="s">V"</span>
     <span class="na">accuracy_decimals</span><span class="pi">:</span> <span class="m">2</span>

   <span class="pi">-</span> <span class="na">platform</span><span class="pi">:</span> <span class="s">template</span>
     <span class="na">name</span><span class="pi">:</span> <span class="s2">"</span><span class="s">Battery</span><span class="nv"> </span><span class="s">Level"</span>
     <span class="na">id</span><span class="pi">:</span> <span class="s">battery_level</span>
     <span class="na">unit_of_measurement</span><span class="pi">:</span> <span class="s2">"</span><span class="s">%"</span>
     <span class="na">accuracy_decimals</span><span class="pi">:</span> <span class="m">0</span>
     <span class="na">lambda</span><span class="pi">:</span> <span class="pi">|-</span>
       <span class="s">float voltage = id(battery_voltage).state;</span>
       <span class="s">if (voltage &lt; 3.0) return 0;</span>
       <span class="s">if (voltage &gt; 4.2) return 100;</span>
       <span class="s">return (voltage - 3.0) / (4.2 - 3.0) * 100.0;</span>

<span class="na">binary_sensor</span><span class="pi">:</span>
  <span class="pi">-</span> <span class="na">platform</span><span class="pi">:</span> <span class="s">status</span>
    <span class="na">name</span><span class="pi">:</span> <span class="s2">"</span><span class="s">${device_id}</span><span class="nv"> </span><span class="s">Status"</span>
    <span class="na">id</span><span class="pi">:</span> <span class="s">device_status</span>
</code></pre></div>  </div>
</details>

<blockquote>
  <p><strong>NOTE:</strong> The image you are downloading must be in PNG format (the only format supported by ESPHome online_image component) and should match the exact image size — 960x680 in our case.</p>
</blockquote>

<blockquote>
  <p><strong>Note:</strong> If your image appears greyish or less visible, especially with more complex images, you may use the wrong display configuration. For troubleshooting, refer to the Waveshare E-Paper Driver HAT guide.
<a href="https://www.waveshare.com/wiki/E-Paper_Driver_HAT">waveshare.com/wiki/E-Paper_Driver_HAT</a>.</p>
</blockquote>

<blockquote>
  <p><strong>Note:</strong> If your image doesn’t refresh completely when switching photos, check your soldering connections. A loose connection could be the cause.</p>
</blockquote>

<h2 id="battery-choice">Battery choice</h2>

<p>The final step for our project is choosing a suitable battery. The key criteria were: we didn’t want to take the frame down to recharge frequently, and the battery needed a slim form factor to fit behind the photo frame.</p>

<p>To determine the necessary mAh for a LiPo battery, we first calculated the daily power consumption, which we divided into two parts: deep-sleep power consumption and per-image switch consumption.</p>

<p>We used a USB-C ammeter to measure the peak current for the image switch consumption. To simplify, we noted the peak, though a better approach would be to place a voltmeter in the chain between the battery and the device. But, as with many things, we took the easier route.</p>

<p>The peak current during a picture change was measured to be 0.128 Ampere.</p>

<p>For the deep-sleep consumption, the usage was so low that we couldn’t measure it with our ammeter. However, after some research, we found that the ESP32 consumes only 10 µA during deep sleep, according to Espressif’s datasheet.
<a href="https://www.espressif.com/sites/default/files/documentation/esp32_datasheet_en.pdf">espressif.com/sites/default/files/documentation/esp32_datasheet_en.pdf</a>.</p>

<p>As a reminder, for the calculations below, Watt equals 1 joule per second, and 24 hours equals 86,400 seconds.</p>

\[\begin{align}
     E_\text{Battery} &amp;= \frac{\text{[Battery mAh]} \cdot \text{[Battery Voltage]}}{1000} \cdot 3600 \text{ Joule / Wh}\\
     &amp;= \left (1500 \text{mAh} \cdot 3.3 \text{V} \right ) / 1000 \cdot 3600 \text{J/Wh} = \underline{17820 \text{ Joule}}\\
    E_\text{picture change} &amp;= \text{Voltage} \cdot \text{Ampere} \cdot \text{Time}\\
    &amp;= 3.3 \text{V} \cdot 0.128\text{A} \cdot 20\text{sec} = \underline{8.4 \text{ Joule}}\\
    E_\text{daily sleep} &amp;= 3.3 \text{V} \cdot 0.00001 \text{A} \cdot 86400 \text{sec} = \underline{2.85 \text{ Joule}}\\
    \text{Battery Life} &amp;= \frac{E_\text{Battery} }{(E_\text{daily sleep} + N \cdot E_\text{picture change})} \\
                 &amp;= \frac{19980 \text{ J}}{\left (3.2 + 1 \cdot 9.5 \right ) \text{J/day}} \approx 1500 \text{ days} \approx 4 \text{ years}
\end{align}\]

<p>Where \(N\) is the number of picture changes per day, in our case, it’s just once per night.</p>

<p>This leads to the conclusion that, with only one picture change per day, the battery should theoretically last 4 years, which, as we know, seems unrealistic. Keep in mind that LiPo batteries have a natural self-discharge rate of 1-5% per month (citation needed).</p>

<p>For the lazy, here’s a Python function to help with the calculation:</p>

<details>
  <summary><b>battery_lifetime.py</b></summary>

  <div class="language-python highlighter-rouge"><div class="highlight"><pre class="highlight"><code><span class="k">def</span> <span class="nf">battery_lifetime</span><span class="p">(</span>
    <span class="n">battery_mah</span><span class="p">:</span> <span class="nb">int</span><span class="p">,</span> <span class="c1"># mAh
</span>    <span class="n">switch_per_day</span><span class="p">:</span> <span class="nb">int</span><span class="p">,</span>
    <span class="n">switch_ampere</span><span class="p">:</span> <span class="nb">float</span> <span class="o">=</span> <span class="mf">0.128</span><span class="p">,</span> <span class="c1"># ampere
</span>    <span class="n">switch_time</span><span class="p">:</span> <span class="nb">float</span> <span class="o">=</span> <span class="mi">20</span><span class="p">,</span> <span class="c1"># sec
</span><span class="p">):</span>
    <span class="n">battery_voltage</span> <span class="o">=</span> <span class="mf">3.3</span>
    <span class="n">sleep_ampere</span> <span class="o">=</span> <span class="mf">0.00001</span>
    <span class="n">daily_seconds</span> <span class="o">=</span> <span class="mi">86400</span>
    <span class="n">e_battery</span> <span class="o">=</span> <span class="p">(</span><span class="n">battery_mah</span> <span class="o">*</span> <span class="n">battery_voltage</span><span class="p">)</span><span class="o">/</span><span class="mi">1000</span> <span class="o">*</span> <span class="mi">3600</span>
    <span class="n">e_picture_change</span> <span class="o">=</span> <span class="n">battery_voltage</span> <span class="o">*</span> <span class="n">switch_ampere</span> <span class="o">*</span> <span class="n">switch_time</span>
    <span class="n">e_daily_sleep</span> <span class="o">=</span> <span class="n">battery_voltage</span> <span class="o">*</span> <span class="n">sleep_ampere</span> <span class="o">*</span> <span class="n">daily_seconds</span>
    <span class="n">days</span> <span class="o">=</span> <span class="p">(</span><span class="n">e_battery</span><span class="p">)</span><span class="o">/</span><span class="p">(</span><span class="n">e_daily_sleep</span> <span class="o">+</span> <span class="n">switch_per_day</span><span class="o">*</span><span class="n">e_picture_change</span><span class="p">)</span>
    <span class="k">return</span> <span class="n">days</span>
</code></pre></div>  </div>

</details>

<blockquote>
  <p><strong>NOTE:</strong> The battery you purchase will likely not arrive with the correct +/- configuration or JST connector size. Do not let the +/- ends touch each other when switching the cables unless you’re prepared to order a new battery.</p>
</blockquote>

<h2 id="mounting-on-the-frame">Mounting on the frame</h2>

<p>You have a few options when mounting the project on the back of your frame.
For those who want to go full overkill, follow Peter’s lead and create a custom 3D-printed mount to be glued to the backside.</p>

<table>
  <tbody>
    <tr>
      <td>a</td>
      <td>b</td>
    </tr>
    <tr>
      <td><img src="/blog/assets/images/eink_art/photos/backside_3dprint_open.png" alt="3D printed enclosure closed" /></td>
      <td><img src="/blog/assets/images/eink_art/photos/backside_3dprint_closed.png" alt="3D printed enclosure closed" /></td>
    </tr>
  </tbody>
</table>

<p>If you don’t have a 3D printer, you can do what Jimmy did: use M2 screws and M2 x5mm spacers, hot-glued to the backside. Screw in the screws and spacers onto the device, then secure it to the frame using hot glue.</p>

<table>
  <tbody>
    <tr>
      <td>a</td>
      <td>b</td>
    </tr>
    <tr>
      <td><img src="/blog/assets/images/eink_art/photos/backside_hotglue.jpg" alt="" /></td>
      <td><img src="/blog/assets/images/eink_art/photos/backside_tape.jpg" alt="" /></td>
    </tr>
  </tbody>
</table>

<p>Both methods allow you to remove the device easily for debugging or maintenance. Some people online have been seen hot-gluing the device directly to the back of the frame, which is a bit extreme… don’t do that.</p>

<p>Use a passepartout (the white border around the display) to give your setup a more professional look.
These typically come with frames, but be aware that the default 30x40cm passepartout we found locally only showed the black outline of the screen.
Ultimately, we had to get a custom-cut passepartout, which could be expensive but gave the setup the final touch, making it look like an actual painting.</p>

<h2 id="the-result">The result</h2>

<p><img src="/blog/assets/images/eink_art/photos/example_rpi_red.jpg" alt="
Setup using Raspberry Pi (with power cable), and the black/white/red WaveShare e-ink screen.
" /></p>

<p><img src="/blog/assets/images/eink_art/photos/front_404.jpg" alt="
Setup when the image queue is out of images.
" /></p>

<p><img src="/blog/assets/images/eink_art/photos/front_triple.jpg" alt="
Setup of synced prompts.
" /></p>

<h2 id="note-on-the-next-version">Note on the next version</h2>

<p>Finishing this project was challenging, as there’s always more to do.
Eventually, we had to say, “Stop.” But for the next version, we’re excited to explore several new ideas:</p>

<ul>
  <li><strong>Using the <code class="language-plaintext highlighter-rouge">ollama</code> models to generate prompts</strong> for picture generation based on themes. For example, if we’re celebrating a birthday, the prompts could focus on party-themed art, birthday cakes, balloons, and other festive elements.</li>
  <li><strong>ESP32 and ZigBee-based live updates</strong>, utilizing ZigBee for wake-on-demand, making the ESP32 push-friendly, while still having a cable-free setup and long battery life.</li>
  <li>The new Waveshare 13.3-inch e-paper screen has a <strong>higher resolution and supports full color</strong>. This would be a fantastic upgrade, but it requires diving deeper into making ESPHome work with this new interface. <a href="https://www.waveshare.com/product/displays/e-paper/epaper-1/13.3inch-e-paper-hat-plus-e.htm">waveshare.com/product/displays/e-paper/epaper-1/13.3inch-e-paper-hat-plus-e.htm</a>.</li>
  <li>Using a webcam or pre-defined pictures to <strong>generate images of guests visiting</strong>, similar to the concept in InfiniteYou. <a href="https://github.com/bytedance/InfiniteYou">github.com/bytedance/InfiniteYou</a>.</li>
  <li>Enhancing the system with <strong>better <code class="language-plaintext highlighter-rouge">matplotlib</code> infographics</strong> and local weather integration, for example, knowing when it’s snowing and integrating with Home Assistant to recommend when and where to go skiing.</li>
</ul>

<h2 id="thanks">Thanks</h2>

<p>Ananda, for offering valuable answers when we hit technical roadblocks.
Kristoffer, for proofreading this page.
Patrick, for handling the soldering.</p>]]></content><author><name>Jimmy &amp; Peter</name></author><category term="AI" /><category term="art" /><category term="e-ink" /><category term="esp32" /><category term="home-assistant" /><summary type="html"><![CDATA[]]></summary></entry><entry><title type="html">Laptop Setup for Travel and Programming (#DigitalNomad)</title><link href="https://charnley.github.io/blog/2025/02/23/remote-work-setup-digital-nomad.html" rel="alternate" type="text/html" title="Laptop Setup for Travel and Programming (#DigitalNomad)" /><published>2025-02-23T00:00:00+00:00</published><updated>2025-02-23T00:00:00+00:00</updated><id>https://charnley.github.io/blog/2025/02/23/remote-work-setup-digital-nomad</id><content type="html" xml:base="https://charnley.github.io/blog/2025/02/23/remote-work-setup-digital-nomad.html"><![CDATA[<p>Are you looking for a traveling office, working abroad, and digital nomad setup?
As a weekend digital nomad, I have some recommendations for you.</p>

<p><img src="/blog/assets/images/home_office.jpeg" alt="
Home office with height-adjustable table
" /></p>

<p>
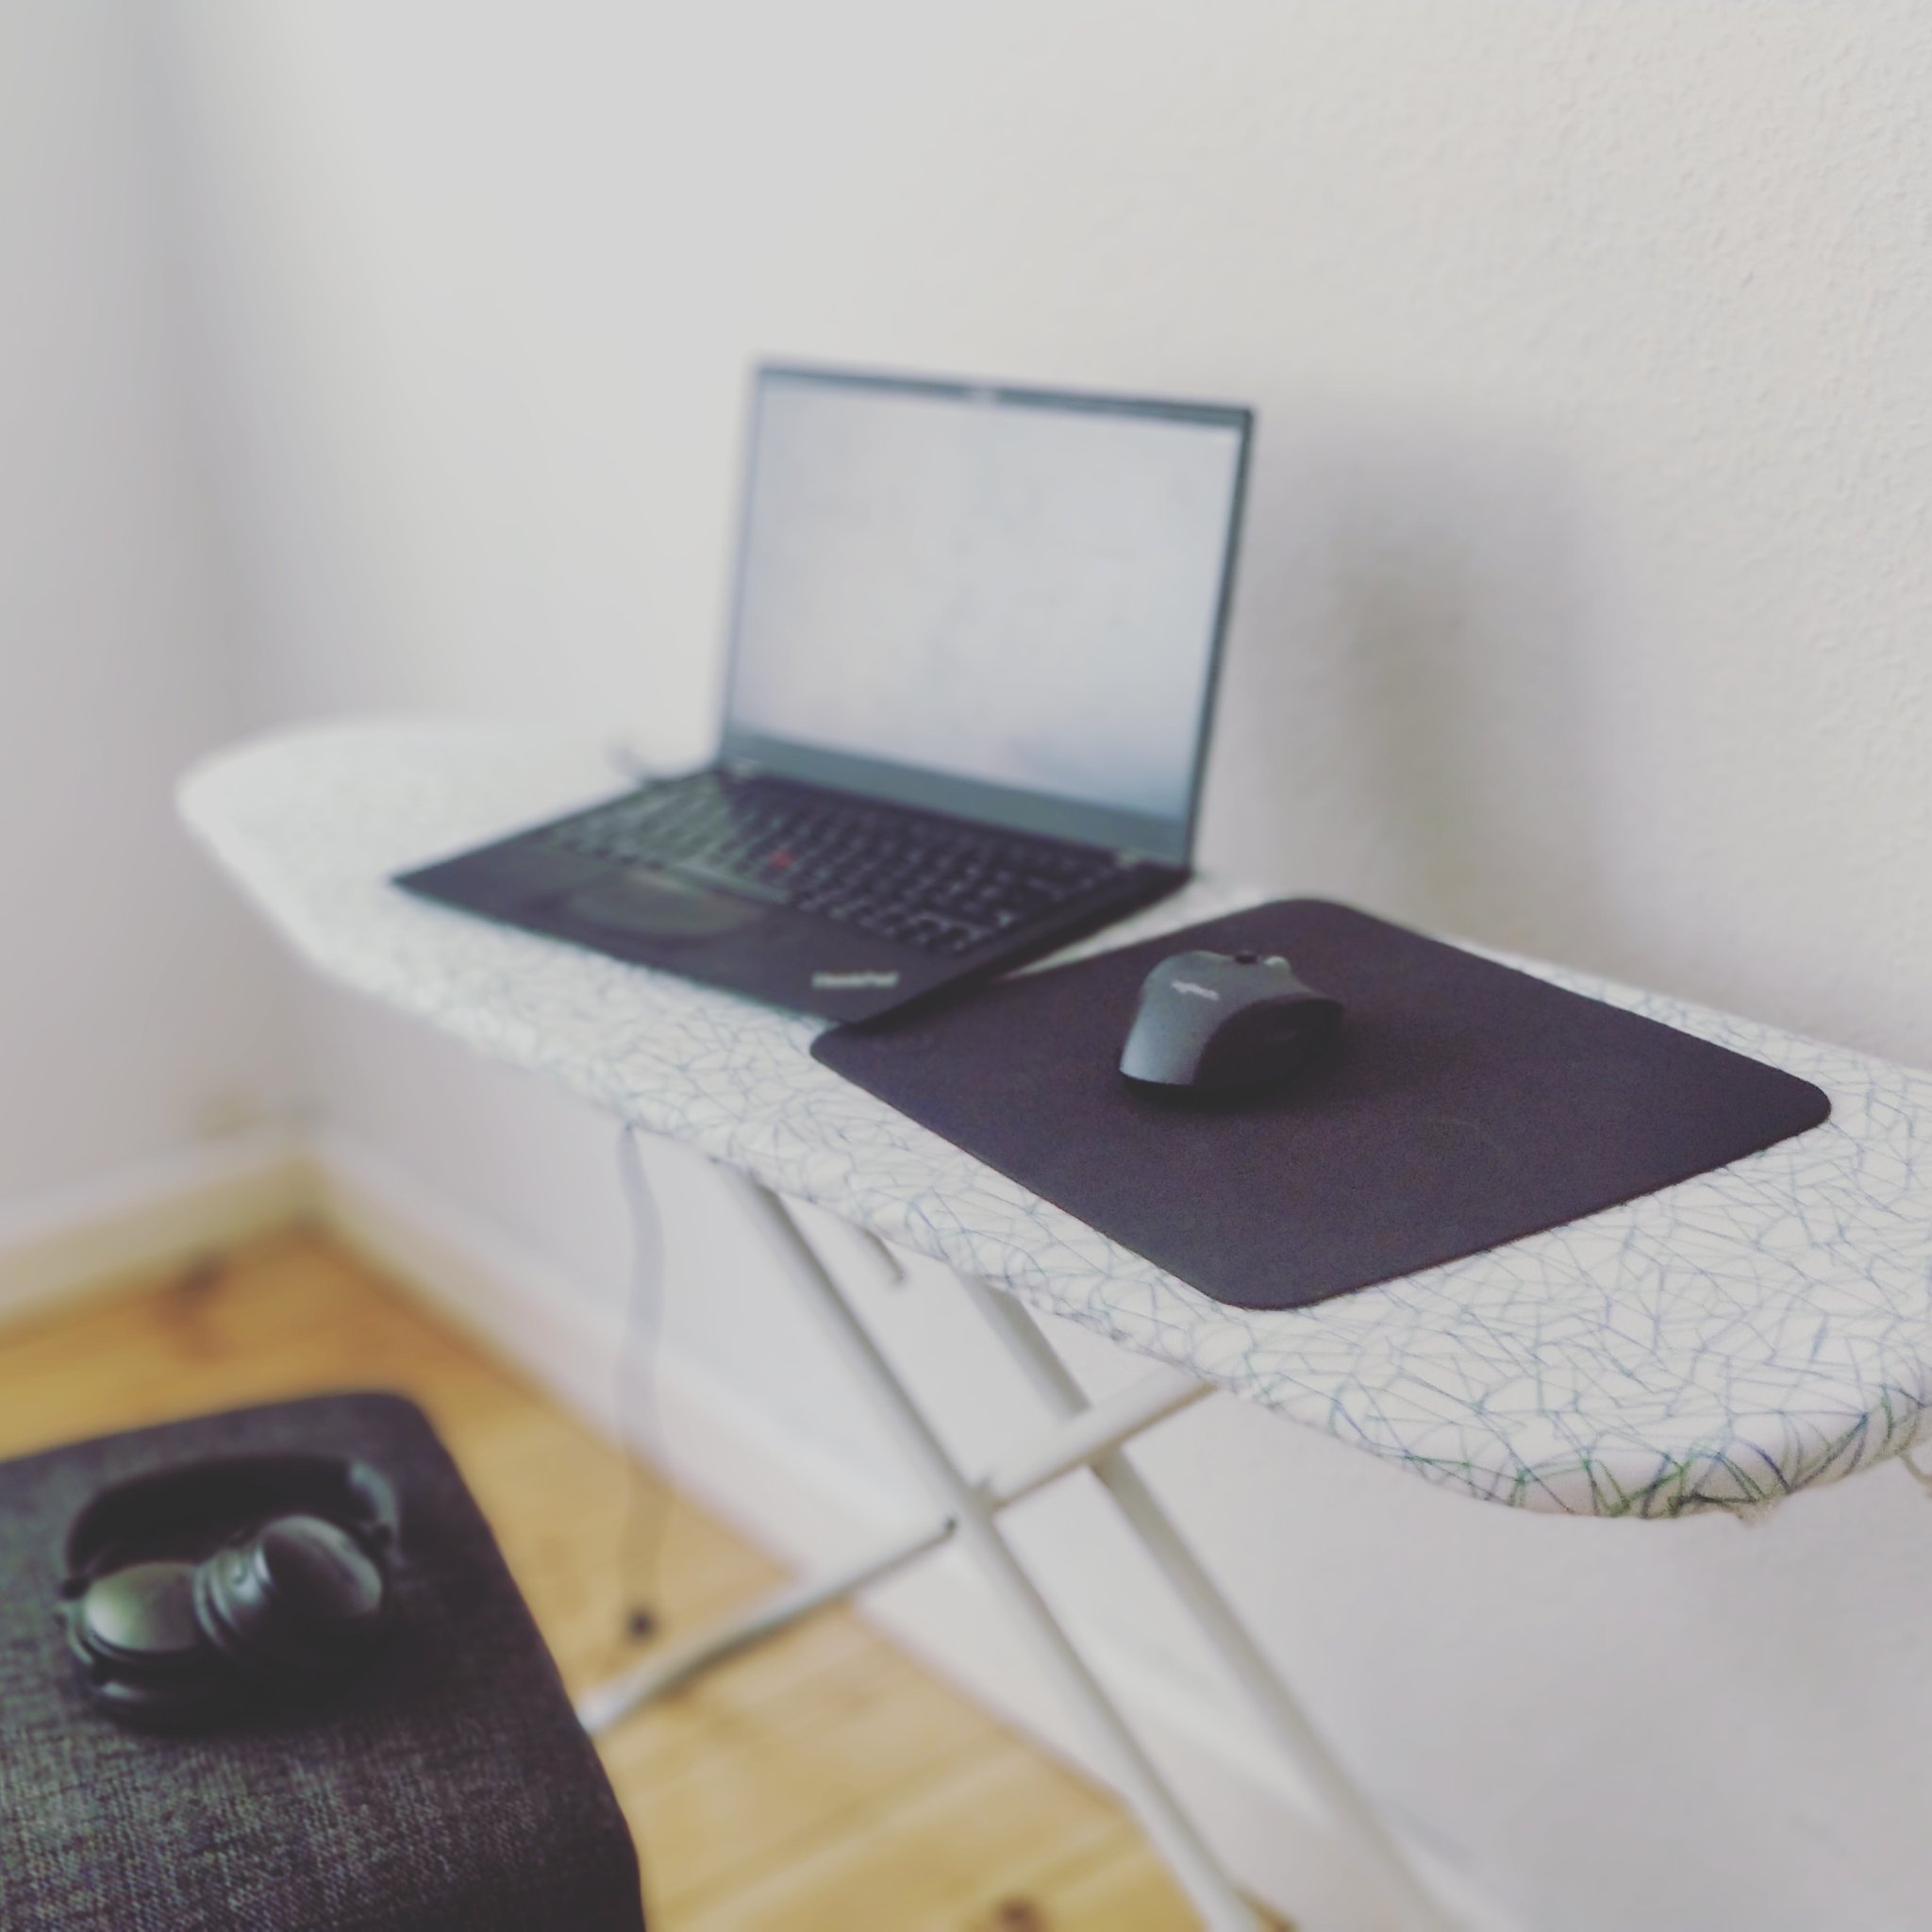
I want to optimize how I work when traveling,
as I am lucky enough to do that occasionally. Hobbyist digital nomad.
This is a small guide on how I set up a to-go workstation.</p>

<p>I hate working from my laptop only. My posture is shit, the screen feels claustrophobic, and the keyboard (especially Mac) feels terrible. So I need something portable to compete with my nice monitor-arm setup at home. The idea is to get a portable monitor and a tripod.</p>

<p><img src="/blog/assets/images/nomad_setup_filter.jpg" alt="
Travel friendly setup.
Set up and productive. Ready to dive into the code. My work laptop is a Mac though.
" /></p>

<p><img src="/blog/assets/images/nomad_setup_packed_filter.jpg" alt="
Setup is packed and ready to travel, for the next work-friendly adventure.
" /></p>

<p>Here’s an interesting hack: I use the standard VESA mount on the back of my monitor to attach it to a tripod. After researching Reddit, I found the NEBULA tripod—typically used for holding projectors—provides excellent stability and sturdiness for this setup. To make the connection, I use a camera/tripod cheese plate with 75x75 M4 screws, which fits perfectly for mounting the monitor onto the tripod.
The M4 screws didn’t fit perfectly, but adding a washer made everything tight and stable.
The trick was found here, by <a href="https://www.reddit.com/user/arbitraryusername10/">user/arbitraryusername10</a>.</p>

<p><img src="/blog/assets/images/nomad_setup_monitor_filter.jpg" alt="
VESA Monitor mount to cheese board
Travel monitor attached to a cheese board, making it tripod friendly
" /></p>

<h2 id="mouse-and-keyboard">Mouse and keyboard</h2>

<p>I am a creature of habit, and I prefer to use the same keyboard and mouse when working from home, in the office, and on the go. Also, when I play on the computer, which is why my mouse and keyboard are a bit overkill.
I am using Logitech G915 TKL keyboard and Logitech Pro Wireless mouse.</p>

<h2 id="usb-hub">USB Hub</h2>

<p>I use a UNI USB-C hub that can handle a USB-C charger, so I can use it as a hub and charge my laptop simultaneously.</p>

<h2 id="webcam-microphone-and-sound">Webcam, microphone and sound</h2>

<p>I don’t need a webcam; my laptop has one. And for the microphone and sound, I use “Bose QuietComfort Earbuds,” which are nice with noise-cancellation.</p>

<h2 id="monitor">Monitor</h2>

<p>There are many options, in varying price ranges. Here are some notes to look out for.</p>

<ul>
  <li>Choose an inch size that is comfortable for you when traveling. I suggest <strong>16-18” range</strong>.</li>
  <li>Get anything with a <strong>1920x1080</strong> (1080p) resolution. Usually, it is the same resolution, no matter the screen’s physical size.</li>
  <li>It <strong>needs VESA mount</strong>, preferably with <strong>M4 screw size</strong>.</li>
  <li>You can use a VESA mount with two or four screws. My experience is two is enough when the screw is thick enough.</li>
  <li>Note the length of the screw, as it needs to be precise. Use washers when required.</li>
</ul>

<blockquote>
  <p>⚠️ <strong>WARNING</strong>: Do not buy a monitor with <strong>M3 screw size</strong> VESA mount. The screws are too small and will not hold anything. I tried it, and with any weight, it fell apart.</p>
</blockquote>

<blockquote>
  <p>Note: ASUS made a ZenScreen MB16QHG Portable Monitor, which seems interesting because it has a built-in tripod mount. However, it is a bit expensive.</p>
</blockquote>

<h2 id="my-personal-shopping-list">My personal shopping list</h2>

<p><em>Disclaimer: These are amazon affiliation links. First time doing it, want to see if it makes a difference.</em></p>

<ul>
  <li>Portable Monitor 18.5 Inch <a href="https://amzn.to/4b9Nkjj">https://amzn.to/4b9Nkjj</a></li>
  <li>CAMVATE Cheese Plate (two-screw VESA mount) <a href="https://amzn.to/3XCxs3t">https://amzn.to/3XCxs3t</a> or
CAMVATE Cheese Plate with 75x75mm (four-screw VESA mount) <a href="https://amzn.to/4kpPO1k">https://amzn.to/4kpPO1k</a></li>
  <li>M4 Screw pack <a href="https://amzn.to/41sayxK">https://amzn.to/41sayxK</a></li>
  <li>NEBULA Capsule Tripod <a href="https://amzn.to/41qPaJn">https://amzn.to/41qPaJn</a></li>
  <li>VVGAOGES Aluminium Laptop Stand <a href="https://amzn.to/41tNLlp">https://amzn.to/41tNLlp</a></li>
  <li>UNI USB-C Hub (can’t remember where I bought it)</li>
</ul>

<p>Total price for my setup: ~250 EUR, excluding work laptop.</p>

<h2 id="references">References:</h2>

<ul>
  <li>Inspiration source: HT <a href="https://www.reddit.com/user/arbitraryusername10/">arbitraryusername10</a>
<a href="https://www.reddit.com/r/digitalnomad/comments/1fv8fwx/lightweight_travel_setup_for_a_secondary_monitor/">https://www.reddit.com/r/digitalnomad/comments/1fv8fwx/lightweight_travel_setup_for_a_secondary_monitor/</a></li>
  <li><a href="https://ternsetups.com/">https://ternsetups.com/</a> Looks good, but I wanted bigger screen, and be able to substitute it.</li>
  <li><a href="https://www.asus.com/ch-en/displays-desktops/monitors/zenscreen/asus-zenscreen-mb16qhg/">https://www.asus.com/ch-en/displays-desktops/monitors/zenscreen/asus-zenscreen-mb16qhg/</a> Interesting monitor from ASUS. Expensive.</li>
</ul>]]></content><author><name></name></author><category term="travel" /><category term="digitalnomad" /><summary type="html"><![CDATA[Are you looking for a traveling office, working abroad, and digital nomad setup? As a weekend digital nomad, I have some recommendations for you.]]></summary></entry><entry><title type="html">Setting up a computational cluster (HPC), part 1</title><link href="https://charnley.github.io/blog/2015/06/11/setting-up-compute-cluster-part-1.html" rel="alternate" type="text/html" title="Setting up a computational cluster (HPC), part 1" /><published>2015-06-11T00:00:00+00:00</published><updated>2015-06-11T00:00:00+00:00</updated><id>https://charnley.github.io/blog/2015/06/11/setting-up-compute-cluster-part-1</id><content type="html" xml:base="https://charnley.github.io/blog/2015/06/11/setting-up-compute-cluster-part-1.html"><![CDATA[<p>So by the power elimination I got put in charge of administration/setup of the local cluster system for the theoretical/computational chemistry department. The current system was completely out-dated, and made it impossible to apt-get update/upgrade, so with the addition of additional 60+ nodes from another cluster it was up to me to save the system! Which practically means I had to set it up from scratch. And a lot of googling. So much googling.</p>

<p>So here is what I did.</p>

<p>First thing first, I wanted it easily maintainable and scalable. There is no way I wanted to install software manually on all the nodes, which means all installation and setup needs to be done automatically from the masternode (frontend).</p>

<p>This was done via PXE/TFTP booting, and installing of a netboot Debian image (with a few extra packages). After the Debian installation, package management and configuration of the nodes is done via Puppet.</p>

<p>To speed things up, the whole installation is done via a local apt-get mirror on the master node. This also insures that all the packages are exactly the same version.</p>

<p>What you need of physical hardware:</p>

<ul>
  <li>a frontend computer (192.168.10.1) (probably with two ethernet ports)</li>
  <li>Nx nodes (192.168.10.x)</li>
  <li>switch(s)</li>
  <li>Ethernet cables</li>
</ul>

<p>The frontend:</p>

<ul>
  <li>hosts a apt-mirror</li>
  <li>hosts all the user accounts (NIS/ypbind)</li>
  <li>hosts home folder (for NFS)</li>
  <li>running {DHCP, TFTP, DNS} (via DNSMASQ) and has PXE image</li>
  <li>running Puppetmaster</li>
  <li>running apache</li>
  <li>running slurm</li>
</ul>

<p>the nodes:</p>

<ul>
  <li>uses the frontend for apt-get server</li>
  <li>uses frontend NIS for all user accounts</li>
  <li>network mounted home folder (NFS)</li>
  <li>running puppet agent</li>
  <li>running slurm deamon</li>
</ul>

<h2 id="setup-of-the-master">Setup of the master</h2>

<h3 id="setup-apt-mirror">Setup apt-mirror</h3>

<p>We want all the nodes to have the same packages installed, also on the frontend, for consistency. The way this is implemented is to have local copy of the apt-get server. You will need apache for http requests.</p>

<div class="language-plaintext highlighter-rouge"><div class="highlight"><pre class="highlight"><code>apt-get install apt-mirror
mkdir /srv/apt # basepath
vi /etc/apt/mirror.list # edit and set basepath in
</code></pre></div></div>

<p>Remember to add debian-installer to the repository list, or the netboot (later on) will have trouble installing debian. Your mirror list should look something like this;</p>

<div class="language-plaintext highlighter-rouge"><div class="highlight"><pre class="highlight"><code>/etc/apt/mirror.list

set base_path    /srv/apt
set nthreads     20
set _tilde       0

deb http://ftp.dk.debian.org/debian/ jessie main main/debian-installer
deb-src http://ftp.dk.debian.org/debian/ jessie main
</code></pre></div></div>

<p>After configuration, apt-mirror and create a symbolic link in your apache webfolder. Apt-mirror will take a few hours to download (approximate 70-90gb)</p>

<div class="language-plaintext highlighter-rouge"><div class="highlight"><pre class="highlight"><code>apt-mirror
cd /var/www
sudo ln -s /srv/apt/mirror/ftp.dk.debian.org/debian debian # create symbolic link to the mirror
</code></pre></div></div>

<p>Now we edit our source list to point and our own mirror instead of the internet</p>

<div class="language-plaintext highlighter-rouge"><div class="highlight"><pre class="highlight"><code>/etc/apt/source.list

deb http://192.168.10.1/debian/ jessie main
</code></pre></div></div>

<p>so we know that we are using same packages as the nodes. Now to update our system we need too;</p>

<p><strong>on the frontend</strong></p>

<div class="language-plaintext highlighter-rouge"><div class="highlight"><pre class="highlight"><code>apt-mirror
apt-update
apt-upgrade
</code></pre></div></div>

<p><strong>on the nodes</strong></p>

<div class="language-plaintext highlighter-rouge"><div class="highlight"><pre class="highlight"><code>apt-update
apt-upgrade
</code></pre></div></div>

<h2 id="setup-dhcp-dns-and-tftp-with-dnsmasq">Setup DHCP, DNS and TFTP with DNSMASQ</h2>

<p>The first thing to setup is the DHCP server on the frontend, and because we want to run a DNS server as well, the easiest service to setup is dnsmasq, instead of ics-dhcp etc.</p>

<div class="language-plaintext highlighter-rouge"><div class="highlight"><pre class="highlight"><code>apt-get install dnsmasq
</code></pre></div></div>

<p>after installation we configure the server with /etc/dnsmasq.conf.</p>

<p>We want to serve DHCP on eth0 interface with TFTP/PXE boot in range 192.168.10.x. For all nodes the mac addresses are then registered</p>

<div class="language-plaintext highlighter-rouge"><div class="highlight"><pre class="highlight"><code>/etc/dnsmasq.conf

interface=eth0
dhcp-range=192.168.10.10,192.168.10.255,72h
# tftp boot
dhcp-boot=pxelinux.0,pxeserver,192.168.10.1
pxe-service=x86PC, "Install Debian", pxelinux
enable-tftp
tftp-root=/srv/tftp
# log
log-queries
log-dhcp
log-facility=/var/log/dnsmasq
# nodes
dhcp-host=00:33:64:b1:83:94,node-hostname
</code></pre></div></div>

<p>We server internet on eth1 and local dhcp on eth0, so we setup a static ip on eth0</p>

<div class="language-plaintext highlighter-rouge"><div class="highlight"><pre class="highlight"><code>/etc/network/interface

auto eth0
iface eth0 inet static
address 192.168.10.1
netmask 255.255.255.0
</code></pre></div></div>

<p>Notice the dhcp-host line where I couple a mac-address to a hostname. The same hostname is then added to the /etc/hosts, for example;</p>

<div class="language-plaintext highlighter-rouge"><div class="highlight"><pre class="highlight"><code>192.168.10.23   node-hostname
</code></pre></div></div>

<h2 id="setup-pxe-booting-image">Setup PXE booting image</h2>

<p>download netboot/netboot.tar.gz for the version of Debian you are using, and setup the PXE boot;</p>

<div class="language-plaintext highlighter-rouge"><div class="highlight"><pre class="highlight"><code>mkdir /srv/tftp
cd /srv/tftp
tar -xf netboot.tar.gz
vi pxelinux.cfg/default
</code></pre></div></div>

<p>edit and setup PXE to use a preseed configuration. If you are unsure what to
put in your preseed script, you can always manually install debian and check
the debconf-get-selections –installer &gt; preseed.cfg output after the
installation, or look at this guide (https://www.debian.org/releases/stable/amd64/apbs04.html.en)[https://www.debian.org/releases/stable/amd64/apbs04.html.en]</p>

<div class="language-plaintext highlighter-rouge"><div class="highlight"><pre class="highlight"><code>pxelinux.cfg/default

default install
label install
    menu label ^Install
    menu default
    kernel debian-installer/amd64/linux
    append initrd=debian-installer/amd64/initrd.gz auto=true priority=critical url=http://192.168.
</code></pre></div></div>

<p>The preseed cfg is placed in the apache http folder so it can be loaded over the net. Remember to setup the mirror settings to use the local mirror on the frontend.</p>

<div class="language-plaintext highlighter-rouge"><div class="highlight"><pre class="highlight"><code>/var/www/sunray-preseed.cfg
</code></pre></div></div>

<ul>
  <li>https://github.com/charnley/debian-cluster-configuration/blob/master/var/www/sunray-preseed.cfg</li>
</ul>

<h2 id="setup-nis-and-nfs">Setup NIS and NFS</h2>

<p>Next is setup of user management and network shared folders (home and opt).</p>

<div class="language-plaintext highlighter-rouge"><div class="highlight"><pre class="highlight"><code>apt-get install nfs-common nfs-kernel-server
</code></pre></div></div>

<p>Set the mount drives</p>

<div class="language-plaintext highlighter-rouge"><div class="highlight"><pre class="highlight"><code>/etc/exports

/home 192.168.10.1/255.255.255.0(rw,sync,no_subtree_check)
/opt 192.168.10.1/255.255.255.0(rw,sync,no_subtree_check)
</code></pre></div></div>

<p>and run</p>

<div class="language-plaintext highlighter-rouge"><div class="highlight"><pre class="highlight"><code>nfs-kernel-server restart
showmount -e
</code></pre></div></div>

<p>And now for NIS</p>

<div class="language-plaintext highlighter-rouge"><div class="highlight"><pre class="highlight"><code>apt-get install nis
</code></pre></div></div>

<p>give it a NIS domain (remember it, mine was “sunray-nis”)</p>

<p>Setup the master to be the server, by editing the file <code class="language-plaintext highlighter-rouge">/etc/defaults/nis</code> making sure that you have the following lines:</p>

<div class="language-plaintext highlighter-rouge"><div class="highlight"><pre class="highlight"><code>NISSERVER=true
NISCLIENT=false
</code></pre></div></div>

<p>Once this is done you need to control which machines are allowed to access the NIS server.
Do this by editing the file <code class="language-plaintext highlighter-rouge">/etc/ypserv.securenets</code> as in the following example:</p>

<div class="language-plaintext highlighter-rouge"><div class="highlight"><pre class="highlight"><code># Restrict to 192.168.1.x
255.255.255.0 192.168.1.0
</code></pre></div></div>

<p>Run the configuration for NIS</p>

<div class="language-plaintext highlighter-rouge"><div class="highlight"><pre class="highlight"><code>/usr/lib/yp/ypinit -m
</code></pre></div></div>

<p>and restart nis</p>

<div class="language-plaintext highlighter-rouge"><div class="highlight"><pre class="highlight"><code>service nis restart
</code></pre></div></div>

<p>Next “setting up puppet/nodes”…</p>]]></content><author><name></name></author><category term="computer" /><category term="chemistry" /><summary type="html"><![CDATA[So by the power elimination I got put in charge of administration/setup of the local cluster system for the theoretical/computational chemistry department. The current system was completely out-dated, and made it impossible to apt-get update/upgrade, so with the addition of additional 60+ nodes from another cluster it was up to me to save the system! Which practically means I had to set it up from scratch. And a lot of googling. So much googling.]]></summary></entry><entry><title type="html">Setting up a computational cluster (HPC), part 2</title><link href="https://charnley.github.io/blog/2015/06/11/setting-up-compute-cluster-part-2.html" rel="alternate" type="text/html" title="Setting up a computational cluster (HPC), part 2" /><published>2015-06-11T00:00:00+00:00</published><updated>2015-06-11T00:00:00+00:00</updated><id>https://charnley.github.io/blog/2015/06/11/setting-up-compute-cluster-part-2</id><content type="html" xml:base="https://charnley.github.io/blog/2015/06/11/setting-up-compute-cluster-part-2.html"><![CDATA[<p>Now that we can easily provide DHCP, DNS and TFTP and a debian image for all the nodes, we want to make it easy to maintain the cluster and setup user management. For maintaining packages and configuration etc we use Puppet on Debian. So awesome!</p>

<blockquote>
  <p><strong>NOTE:</strong> remember to add “puppet” and “puppetmaster” in /etc/hosts on the server, so dnsmasq can provide DNS! Otherwise puppet agent will not know where to connect.</p>
</blockquote>

<h2 id="setup-puppet-on-the-master">Setup Puppet on the master</h2>

<p>Install the puppetmaster on the master node</p>

<div class="language-plaintext highlighter-rouge"><div class="highlight"><pre class="highlight"><code>apt-get install puppetmaster
</code></pre></div></div>

<p>A nice addition to the puppet service is the stdlib.</p>

<div class="language-plaintext highlighter-rouge"><div class="highlight"><pre class="highlight"><code>puppet module install puppetlabs-stdlib
</code></pre></div></div>

<p>regular expression and autosign.conf for fast deployment
See the configuration of puppet here https://github.com/charnley/debian-cluster-configuration/tree/master/etc/puppet/manifests</p>

<p>Where NIS is setup as</p>

<div class="language-plaintext highlighter-rouge"><div class="highlight"><pre class="highlight"><code>## User Authentication
# set NIS domain
file {"/etc/defaultdomain": source =&gt; "puppet:///modules/nodes/defaultdomain"} -&gt;
# set yp server
file {"/etc/yp.conf": source =&gt; "puppet:///modules/nodes/yp.conf"} -&gt;
# install NIS
package {"nis": ensure =&gt; installed} -&gt;
# update passwd, shadow and gshadow
file_line {'update passwd': path =&gt; '/etc/passwd', line =&gt; '+::::::'} -&gt;
file_line {'update shadow': path =&gt; '/etc/shadow', line =&gt; '+::::::::'} -&gt;
file_line {'update group': path =&gt; '/etc/group', line =&gt; '+:::'} -&gt;
file_line {'update gshadow': path =&gt; '/etc/gshadow', line =&gt; '+:::'}
</code></pre></div></div>

<p>Where NFS is setup as</p>

<h2 id="network-file-system">Network File System</h2>
<div class="language-plaintext highlighter-rouge"><div class="highlight"><pre class="highlight"><code>package {"nfs-common": ensure =&gt; installed}
file_line {'nfs home':
path =&gt; '/etc/fstab',
line =&gt; '192.168.10.1:/home /home nfs rw,hard,intr 0 0',
require =&gt; Package["nfs-common"],
notify =&gt; Exec['nfs mount'],
}
file_line {'nfs opt':
path =&gt; '/etc/fstab',
line =&gt; '192.168.10.1:/opt /opt nfs rw,hard,intr 0 0',
require =&gt; Package["nfs-common"],
notify =&gt; Exec['nfs mount'],
}
exec {'nfs mount':
command =&gt; '/bin/mount -a',
path =&gt; '/usr/local/bin',
refreshonly =&gt; true,
}
</code></pre></div></div>

<p>You can either set <code class="language-plaintext highlighter-rouge">autosign.conf</code> in the puppet folder to just sign everything, and sign the nodes as the connect via</p>

<div class="language-plaintext highlighter-rouge"><div class="highlight"><pre class="highlight"><code>puppet cert sign --all
</code></pre></div></div>

<p>Setup of the node
Puppet is installed via det preseed configuration by adding</p>

<div class="language-plaintext highlighter-rouge"><div class="highlight"><pre class="highlight"><code>d-i pkgsel/include string openssh-server puppet facter
</code></pre></div></div>

<p>Puppet needs to connect and get a certificate signed by the server. This is either done by autosign or by manually signing the nodes</p>

<div class="language-plaintext highlighter-rouge"><div class="highlight"><pre class="highlight"><code>puppet agent --test --waitforcert 60
</code></pre></div></div>

<p>Puppet is then either run by manually or by adding puppet to the <code class="language-plaintext highlighter-rouge">/etc/rc.local</code> to be run on every boot.</p>

<div class="language-plaintext highlighter-rouge"><div class="highlight"><pre class="highlight"><code>/etc/rc.local

#!/bin/bash
echo -n "Waiting for network."
while ! ip addr show | grep -F "inet 192.168.10" &gt;&gt; /dev/null
do
    sleep 1
    echo -n "."
done
# Run puppet for node
echo "Running puppet..."
echo "boot $(date)" &gt;&gt; /root/puppet-node.log
puppet agent -t | while read line; do
    echo $line
    echo $line &gt;&gt; /root/puppet-node.log
done
</code></pre></div></div>

<p>And that’s it. Happy clustering.</p>]]></content><author><name></name></author><category term="computer" /><category term="chemistry" /><summary type="html"><![CDATA[Now that we can easily provide DHCP, DNS and TFTP and a debian image for all the nodes, we want to make it easy to maintain the cluster and setup user management. For maintaining packages and configuration etc we use Puppet on Debian. So awesome!]]></summary></entry><entry><title type="html">Calculate RMSD from two XYZ files</title><link href="https://charnley.github.io/blog/2013/04/26/calculate-rmsd-from-two-xyz.html" rel="alternate" type="text/html" title="Calculate RMSD from two XYZ files" /><published>2013-04-26T00:00:00+00:00</published><updated>2013-04-26T00:00:00+00:00</updated><id>https://charnley.github.io/blog/2013/04/26/calculate-rmsd-from-two-xyz</id><content type="html" xml:base="https://charnley.github.io/blog/2013/04/26/calculate-rmsd-from-two-xyz.html"><![CDATA[<p>I want to calculate the RMSD (Root-mean-square deviation) between two molecule structures in XYZ format. And after googling around I concluded that the easiest way to do it was to use pymol. However being a CLI user, I do not want to download the files and open up a GUI all the time, I just want a script that can do it via a terminal. Time for a little google and python project.</p>

<p>Calculating the RMSD mathematically for two sets of xyz coordinates for n particles is straight forward:</p>

\[\mathrm{RMSD}(v,w) = \sqrt{  \frac{1}{n} \sum_{i=1}^n ((v_{ix} - w_{ix})^2 + (v_{iy} - w_{iy})^2 + (v_{iz} - w_{iz})^2 ) }\]

<p>However this is without taking into account that the two molecules could be identical and only translated in space.
To solve this we need to position the molecules in the same center and rotate one onto the other.</p>

<p>The problem is solved by first find the centroid for both molecules and translating both molecules to the center of the coordinate system.
Then we need an algorithm to align the molecules by rotation. For this I found <a href="http://dx.doi.org/10.1107%2FS0567739476001873">Kabsch algorithm</a> from 1976.</p>

<blockquote>
  <p>It is a method for calculating the optimal rotation matrix, that minimzes the RMSD between two paired set of points</p>

  <p>http://en.wikipedia.org/wiki/Kabsch_algorithm</p>
</blockquote>

<p>The algorithm is nicely written out on wikipedia, so it was straight forward to implement (still took me a little time though). So I wont go into details of it here.</p>

<p>However it is clear that the centering the molecules using their centeroid could possibly not be the best way of finding the minimal RMSD between two vector sets. So +Lars Bratholm got the idea of using a fitting function, fitting the center of the molecules and using Kabsch to calculate a minimal RMSD.</p>

<p><strong>Code:</strong> You can find the code and examples here: github.com/charnley/rmsd</p>

<p>Usage:</p>

<div class="language-plaintext highlighter-rouge"><div class="highlight"><pre class="highlight"><code>./calculate_rmsd.py molecule1.xyz molecule2.xyz
</code></pre></div></div>

<p><strong>Results:</strong> The output will then be “pure rmsd”, “rmsd after rotation” and “rmsd after fit”.</p>

<p>Note; for a testcase I calculated the rmsd for a molecule set with 140 atoms, to be ~0.15, and when I did the same calculation in pymol I got 0.092. However pymol did state that it was cutting 20 atoms, but didn’t state which, where as my script takes all the atoms into account.</p>]]></content><author><name></name></author><category term="chemistry" /><summary type="html"><![CDATA[I want to calculate the RMSD (Root-mean-square deviation) between two molecule structures in XYZ format. And after googling around I concluded that the easiest way to do it was to use pymol. However being a CLI user, I do not want to download the files and open up a GUI all the time, I just want a script that can do it via a terminal. Time for a little google and python project.]]></summary></entry><entry><title type="html">PM6 in GAMESS, Part 2</title><link href="https://charnley.github.io/blog/2012/08/31/pm6-in-gamess-part2.html" rel="alternate" type="text/html" title="PM6 in GAMESS, Part 2" /><published>2012-08-31T00:00:00+00:00</published><updated>2012-08-31T00:00:00+00:00</updated><id>https://charnley.github.io/blog/2012/08/31/pm6-in-gamess-part2</id><content type="html" xml:base="https://charnley.github.io/blog/2012/08/31/pm6-in-gamess-part2.html"><![CDATA[<p>Okay, so I’m still working on implementing PM6 integrals in GAMESS.</p>

<p>I got the source code from MOPAC 7.1 which includes d-integrals for the MNDO-D method (which is what Jimmy Stewart is using for PM6 in the newest MOPAC (hopefully), which originates from a program written by Walter Thiel).</p>

<p>So the strategy is simply to ‘export’ the subroutines / modules from MOPAC 7.1 needed to replicate the d-integrals in GAMESS (written in Fortran 90),  and ‘import’ them into GAMESS-US.
Now, the semi-emperical part of GAMESS-US is actually based on a older version of MOPAC (written in Fortran 77) so the subroutines should be very similar to the code I’ll be trying to import.</p>

<p>First part of this mission is too map the relevant subroutines in both GAMESS and MOPAC. And hopefully I’ll be able too se a pattern and merge the ‘trees’.</p>

<p>The map for MOPAC is:</p>

<p><img src="/blog/assets/images/pm6_mndod_submap.png" alt="Subroutine map for MNDO MOPAC" />
<em>
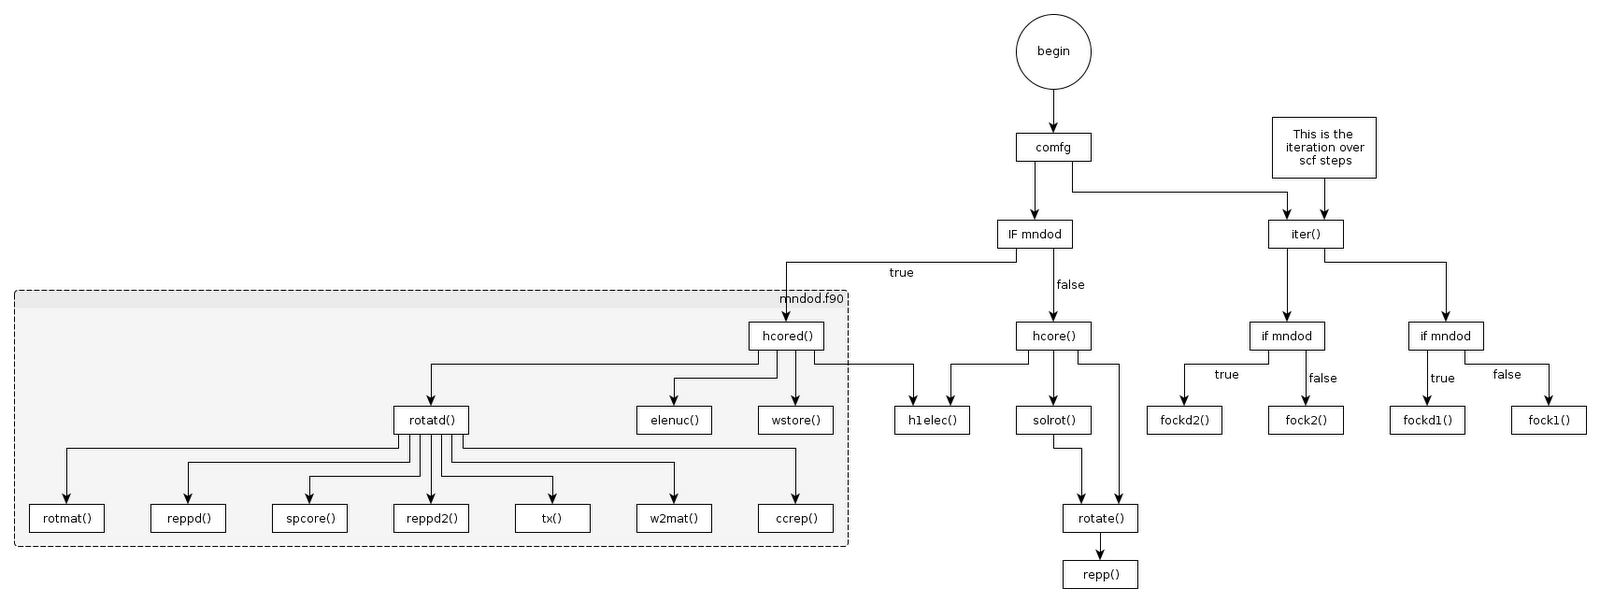
Figure 1: Subroutine map of MNDO in MOPAC</em></p>

<p>And the map for GAMESS is:</p>

<p><img src="/blog/assets/images/pm6_gamess_submap.png" alt="Subroutine map for MNDO GAMESS" />
<em>
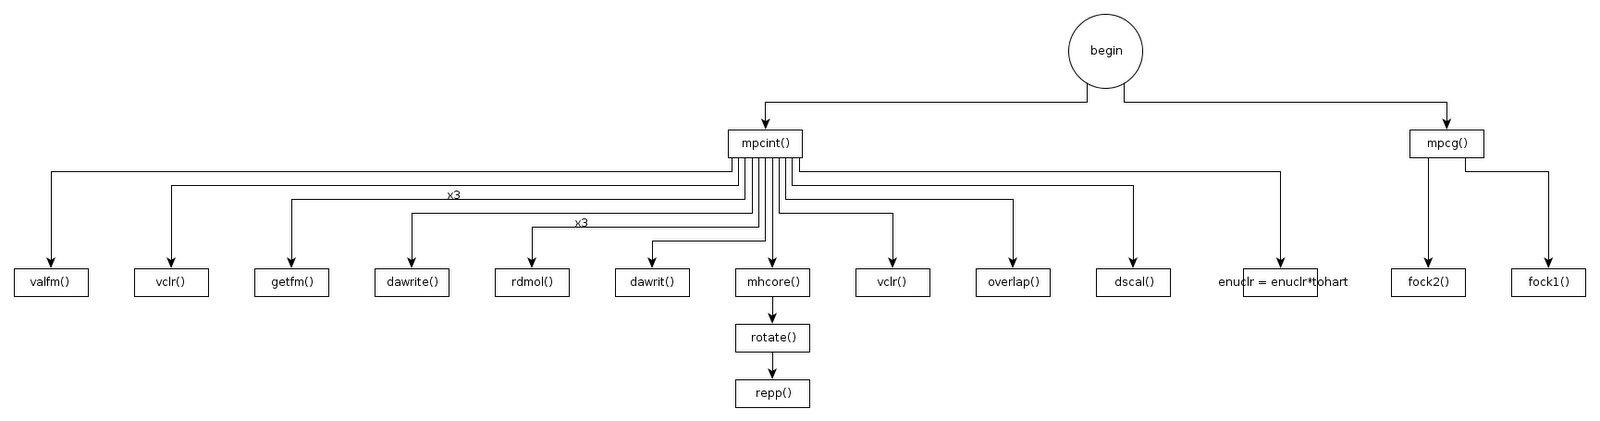
Figure 2: Subroutine map of MNDO in MOPAC</em></p>

<p>Now I just need an idea for merging the two trees. Since Stewart based his d-integrals on code he got from Thiel it seems like most of the subroutines is collected in a single file called mndod.F90 (fitting name, lol).</p>

<p>This means I ‘just’ (I beginning to hate that work) need to copy-and-paste the file into GAMESS and make sure the file is hooked to GAMESS common blocks instead of the fortran 90 modules from MOPAC. So step 1: Include the file and make it compile (which is a lot of rewriting interfaces and modules into the actual file so it is a standalone solution.)</p>

<p>The highlighted area is only the first part of the problem though. After the fock matrix has been put together with the new and cool d-items the matrix needs to be solved and we need the fockd1 and fockd2 for that. They are conveniently also put in the same file with the rest of the subroutines.</p>

<p>Furthermore I have been told by +Jan Jensen that I need to watch out for ‘guessmo’ subroutine when implementing the new integrals. As described in his figure;</p>

<p><img src="/blog/assets/images/pm6_janhjensen_subroutine_map.jpg" alt="Subroutine map for GAMESS" />
<em>
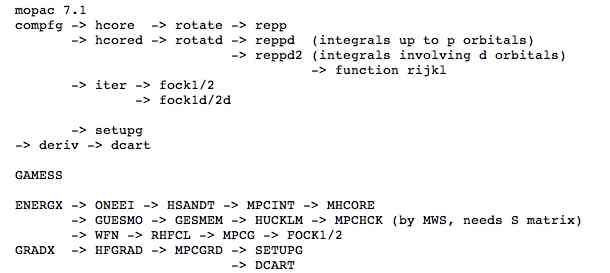
Figure 3: Subroutine map of MNDO in MOPAC</em></p>

<p>So to recap, implementation in 5 easy steps (said in a very television kitchen accent):</p>

<p>Step 1: Get mndod.f90 compiled with gamess (using gamess common blocks instead of mopac modules and interfaces)</p>

<p>Step 2: Integration: Make IF(PM6) and run the mndod code instead of gamess with pm6 parameters and more.</p>

<p>Step 3: Integration: Make IF(PM6) and run the fock-d 1 and 2 instead in mpcg()</p>

<p>Step 4: Find out why it does not work and solve the problem.</p>

<p>Step 5: Celebration.</p>

<p>To be continued!</p>]]></content><author><name></name></author><category term="chemistry" /><category term="gamess" /><summary type="html"><![CDATA[Okay, so I’m still working on implementing PM6 integrals in GAMESS.]]></summary></entry><entry><title type="html">Compiling and setting up GAMESS</title><link href="https://charnley.github.io/blog/2012/08/31/compile-and-setting-up-gamess.html" rel="alternate" type="text/html" title="Compiling and setting up GAMESS" /><published>2012-08-31T00:00:00+00:00</published><updated>2012-08-31T00:00:00+00:00</updated><id>https://charnley.github.io/blog/2012/08/31/compile-and-setting-up-gamess</id><content type="html" xml:base="https://charnley.github.io/blog/2012/08/31/compile-and-setting-up-gamess.html"><![CDATA[<blockquote>
  <p><strong>NOTE 2025 Feb:</strong> Disclaimer, this guide is very old and most likely setting up GAMESS is way easier.</p>
</blockquote>

<p>Small guide on how to setup the QM software <a href="http://www.msg.ameslab.gov/gamess/">GAMESS</a> on a normal Ubuntu computer and work in parallel with multiple nodes (via sockets).
Loosely this is based on <a href="http://molecularmodelingbasics.blogspot.dk/2010/08/compiling-gamess-on-linux-pc.html">this guide</a> on how to compile GAMESS.</p>

<h2 id="setup">Setup</h2>

<p>I’m going to pretend that you are working on Ubuntu 12.04 LTS, but I’m sure you can relate it to whatever distribution you are working on.
Download and compile</p>

<ol>
  <li>
    <p>Download the newest GAMESS from <a href="http://www.msg.ameslab.gov/gamess/License_Agreement.html">http://www.msg.ameslab.gov/gamess/License_Agreement.html</a></p>
  </li>
  <li>
    <p>Run config</p>
  </li>
</ol>

<p>in the shell</p>

<div class="language-plaintext highlighter-rouge"><div class="highlight"><pre class="highlight"><code>./config
</code></pre></div></div>

<p>and answer the questions. Answer them truthfully.</p>

<ol>
  <li>Compile DDI</li>
</ol>

<p>DDI is used to run the GAMESS executable, compile it by</p>

<div class="language-plaintext highlighter-rouge"><div class="highlight"><pre class="highlight"><code>make ddi
</code></pre></div></div>

<ol>
  <li>Compile GAMESS</li>
</ol>

<p>After compiling DDI and setting up the config, we can just write</p>

<div class="language-plaintext highlighter-rouge"><div class="highlight"><pre class="highlight"><code>make
</code></pre></div></div>

<p>and everything will happen automatically. You can add the flag “-j4” if you
have 4 CPU’s and want the compiling to go a little faster. It takes a few
minutes.</p>

<h2 id="compiling-without-math-library">Compiling without Math library</h2>

<p>Note on compiling without a math library, like MKL. In some versions of GAMESS the linking will fail with error message like “including missing subroutines for vector operations failed”. This is what the math libraries are used for. For Ubuntu you can install  BLAS and LAPACK easily with</p>

<div class="language-plaintext highlighter-rouge"><div class="highlight"><pre class="highlight"><code>sudo apt-get install libblas3gf libblas-doc libblas-dev
sudo apt-get install liblapack3gf liblapack-doc liblapack-dev
</code></pre></div></div>

<p>Now we just need to change the <code class="language-plaintext highlighter-rouge">./liked</code> script and add some compiler flags. 
If you are compiling with gfortran then you need to find and update the following two lines in ./lked under the gfortran section.</p>

<div class="language-plaintext highlighter-rouge"><div class="highlight"><pre class="highlight"><code>- set BLAS='blas.o'
- set MATHLIBS=' '
+ set BLAS=''
+ set MATHLIBS='-lblas -llapack '
</code></pre></div></div>

<p>and similar if you are using ifort to compile edit the section in lked and set the correct compiler flags.
and then it should liked alright.</p>

<h2 id="update-rungms">Update rungms</h2>

<p>To run GAMESS there is a included a run script in the root folder, which needs to be updated located in the beginning, for the scratch folder and GAMESS path. so, edit (using VIM, if you are awesome, EMACS, if you are not).</p>

<div class="language-plaintext highlighter-rouge"><div class="highlight"><pre class="highlight"><code>vi rungms
</code></pre></div></div>

<p>and set following paths to the correct (and obviously not my username);</p>

<div class="language-plaintext highlighter-rouge"><div class="highlight"><pre class="highlight"><code>set SCR=/home/$USER/scr
set USERSCR=/home/$USER/scr
set GMSPATH=/home/$USER/opt/gamess
</code></pre></div></div>

<p>Note: GAMESS doesn’t work?!</p>

<p>Pro tip by +Anders Christensen
If this is the first time you are trying to get GAMESS working on your Linux machine, you will need to set kernel.shmmax to 1610612736. This is done by either;</p>

<div class="language-plaintext highlighter-rouge"><div class="highlight"><pre class="highlight"><code>/sbin/sysctl -w kernel.shmmax=1610612736
</code></pre></div></div>

<p>or if you don’t want to do the command (or don’t have root access) every time you boot up, open the file called:</p>

<div class="language-plaintext highlighter-rouge"><div class="highlight"><pre class="highlight"><code>/etc/sysctl.conf
</code></pre></div></div>

<p>and add the following line:</p>

<div class="language-plaintext highlighter-rouge"><div class="highlight"><pre class="highlight"><code>kernel.shmmax=1610612736
</code></pre></div></div>

<p>Running the GAMESS testcase (exam)
Included in GAMESS is a list of input files to be tested to see if the software
is working as it should. This is also useful to run if you do changes to the
source code. Go to the root of the GAMESS folder and write.</p>

<div class="language-plaintext highlighter-rouge"><div class="highlight"><pre class="highlight"><code>./runall
./tests/standard/checktst
</code></pre></div></div>

<p>This will then output all the exams. If all is passed, then GAMESS should be working alright.</p>

<h2 id="setting-up-cluster-calculation">Setting up cluster calculation</h2>

<p>If you want to have GAMESS working with a cluster system then there are a few things to change.
This is to get the parallelization with sockets to work.</p>

<h3 id="1-update-rungms">1. Update rungms</h3>

<p>You’ll need to edit the part of rungms that checks the hostname of the current node. As present the rungms check if you are running calculations on any of the Iowa nodes (where GAMESS is developed), and you are probably not.</p>

<p>Find the following if-statement and switch;</p>

<div class="language-plaintext highlighter-rouge"><div class="highlight"><pre class="highlight"><code>if ($NCPUS &gt; 1) then
    switch (`hostname`)
</code></pre></div></div>

<p>and locate the default switch case, and outcomment the “exit”, just because the rungms doesn’t regonize your hostname. If you are using a cluster system, you are probably using some kind of queuing system, like PBS og LoadLeveler. Here is what you need to change on the specific system;</p>

<h3 id="11-pbs-specific">1.1 PBS specific</h3>

<p>PBS should be working out-of-the box. As long as you have fixed the above hostname exit. If you don’t need the user-scratch file, you can set $USERSCR to “/scratch/$PBS_JOBID” as $SCR, under</p>

<div class="language-plaintext highlighter-rouge"><div class="highlight"><pre class="highlight"><code>if ($SCHED == PBS) then
</code></pre></div></div>

<h3 id="12-loadleveler-specific">1.2 LoadLeveler specific</h3>

<p>As default, rungms does not contain loadleveler default settings, so you will need to setup the following test.</p>

<div class="language-plaintext highlighter-rouge"><div class="highlight"><pre class="highlight"><code>if ($?LOADL_STEP_ID) set SCHED=LOADL
</code></pre></div></div>

<p>under ‘batch schedular’ section, and then add the case</p>

<div class="language-plaintext highlighter-rouge"><div class="highlight"><pre class="highlight"><code>if ($SCHED == LOADL) then
    set SCR=/scratch/$LOADL_STEP_ID
endif
</code></pre></div></div>

<p>If you don’t use the $USERSCR output, you can set that too the local scratch folder as well.</p>

<h3 id="2-setting-up-input-file">2. Setting up input file</h3>

<p>If you are running the calculation across multiple nodes, you’ll need to tell the GAMESS executable how many nodes you are using, this is done simply by stating, fx. for 10 nodes;</p>

<div class="language-plaintext highlighter-rouge"><div class="highlight"><pre class="highlight"><code> $gddi
  ngroup=10
 $end

 $system
  mwords=256
 $end
</code></pre></div></div>

<p>in the input file, with mwords being how much memory you want to allocate.</p>

<p>Remember: Remember that you need 1 space before the sections on GAMESS input files.</p>

<h2 id="the-end">The end</h2>

<p>And that’s it. So simple and easy out-of-the-box. You should be running loads of QM calculations now.</p>

<p>Happy GAMESS’ing</p>

<h2 id="comments">Comments</h2>

<p>The original blogpost is very old, and moved from blogspot. It got some critique which will be included here</p>

<blockquote>
  <blockquote>
    <p>Always select “sockets” and never “MPI”!</p>
  </blockquote>

  <p>Unknown 17 February 2014 at 09:21</p>
</blockquote>

<blockquote>
  <blockquote>
    <p>Actually, PBS does <em>not</em> work out of the box because the defaults are some obscure and based on a computer cluster at ISU in Ames.</p>

    <p>You should change</p>

    <p>if (<code class="language-plaintext highlighter-rouge">uname</code> == Linux) set NETEXT=”.myri”</p>

    <p>into</p>

    <p>if (<code class="language-plaintext highlighter-rouge">uname</code> == Linux) set NETEXT=””</p>

    <p>because you do most likely not have a myrinet network and similarly you should set the line</p>

    <p><code class="language-plaintext highlighter-rouge">set spacer2=":netext="</code> to <code class="language-plaintext highlighter-rouge">set spacer2=""</code></p>

    <p>That will make it run on PBS.</p>
  </blockquote>

  <p>Unknown 17 February 2014 at 10:44</p>
</blockquote>

<blockquote>
  <blockquote>
    <p>Actually, there is more:</p>

    <p>1) For an FMO calculation, the ridiculous amount of memory you have specified (5000 mega words = 40 GB) is a serious waste. Use something more like 256 (which is 2 GB) or even half of that. This memory will be allocated per core depending on your setup and the type of calculation you are running.</p>

    <p>2) if you are not going to make something other than having 10 groups (10 nodes) then it is a waste to actually have the NGRFMO(1)=10 specified. NGRFMO is used to control the number of groups specified for each part of a calculation and if you do not specify anything, then NGRFMO(1)=NGROUP.</p>

    <p>3) in general it is a bad idea to set USERSCRtoSCR when you are running on a cluster. There might be files you are interested in which will be lost when the queue-system cleans up after you.</p>
  </blockquote>

  <p>Unknown 17 February 2014 at 10:50</p>
</blockquote>]]></content><author><name></name></author><category term="chemistry" /><category term="gamess" /><summary type="html"><![CDATA[NOTE 2025 Feb: Disclaimer, this guide is very old and most likely setting up GAMESS is way easier.]]></summary></entry><entry><title type="html">PM6 in GAMESS, Part 1</title><link href="https://charnley.github.io/blog/2012/08/28/pm6-in-gamess-part1.html" rel="alternate" type="text/html" title="PM6 in GAMESS, Part 1" /><published>2012-08-28T00:00:00+00:00</published><updated>2012-08-28T00:00:00+00:00</updated><id>https://charnley.github.io/blog/2012/08/28/pm6-in-gamess-part1</id><content type="html" xml:base="https://charnley.github.io/blog/2012/08/28/pm6-in-gamess-part1.html"><![CDATA[<p>Okay, so I’m working on implementing the semi-empirical method PM6 (by Jimmy “Mopac” Stewart) in GAMESS-US.</p>

<p>The status is; (before I started working) GAMESS has up to and including PM3 already implemented. So the idea is just to update the SE parameters and substitute the subroutines necessary to get PM6 working. Without prior knowledge to GAMESS this really did not sound like a big deal, as the differences between PM6 and PM3 only lies in the way the parameters are used (roughly). The parameterization of PM3 (and AM1) is utilised in the core-core repulsion term (nuclear repulsion) of the Heat of Formation to compensate for the aproximations made in SE methods. Heat of Formation is calcuated acordingly:</p>

\[\Delta H_f = E_{\rm Elect} + E_{\rm Core} - \sum_{A}^{} E_{el}^{A} + \sum_{A}^{} \Delta H_{f}^{A}\]

<p>The emperical parameters from PM3 is fitted via a scaleing factor on the core-core term to fit the experimental heat of formation for the molecule. Fitting of the data and derivation of the parameters was done my Jimmy Stewart, for his program MOPAC where the methods were original implemented. The PM3 core-core repulsion term looks like this;</p>

\[E_n(A,B) = Z_A Z_B \langle s_A s_A | s_B s_B \rangle \left ( 1 + e^{-\alpha_A R_{AB}} + e^{-\alpha_B R_{AB}} \right )\]

<p>which is then summed over all nuclear repulsions/interactions between any atom A and B. This core-core term needs to be substituted with the new term from PM6:</p>

\[E_n(A,B) = Z_A Z_B \langle s_A s_A | s_B s_B \rangle \left ( 1 + x_{AB} e^{-\alpha_{AB} (R_{AB} + 3 \cdot 10^{-4} R_{AB}^6)} \right )\]

<p>Note that the $\alpha$ parameter is now a di-atomic parameter unlike the mono-atomic parameter is PM3. Another parameter $x$ is also introduced, but that is ‘pritty much it’. (there are also a Lennard Jones Term and a van der Waals term, but that is for another blog post). The parameters are all located in the PM6 article, but Jimmy Stewart was kind of enough to send his files including his implementation of PM6 core equation and the list of all parameters. This saved me alot of pointless typing time, so thanks!</p>

<p>Okay, so after implementing the new PM6 specific code and the corresponding parameters, I discovered that the result did not match its MOPAC equivalent. In fact nether electronic, core or the total energy fit the MOPAC value. This was happening for single point energy calculation even for very small molecules (even water). For reference I did a similar test for PM3 and AM1, and found that the already implemented methods results did not fit it’s rightfull energies (MOPAC energy) with the same order of magnitude as PM6, which was quickly discovered to be size dependt. This is clearly shown in the below figure, which shows single point energy calculations on a carbon chain from 1 carbon to 20 carbons</p>

<p><img src="/blog/assets/images/errorbar_am1pm3pm6.png" alt="Errors are bad" />
<em>
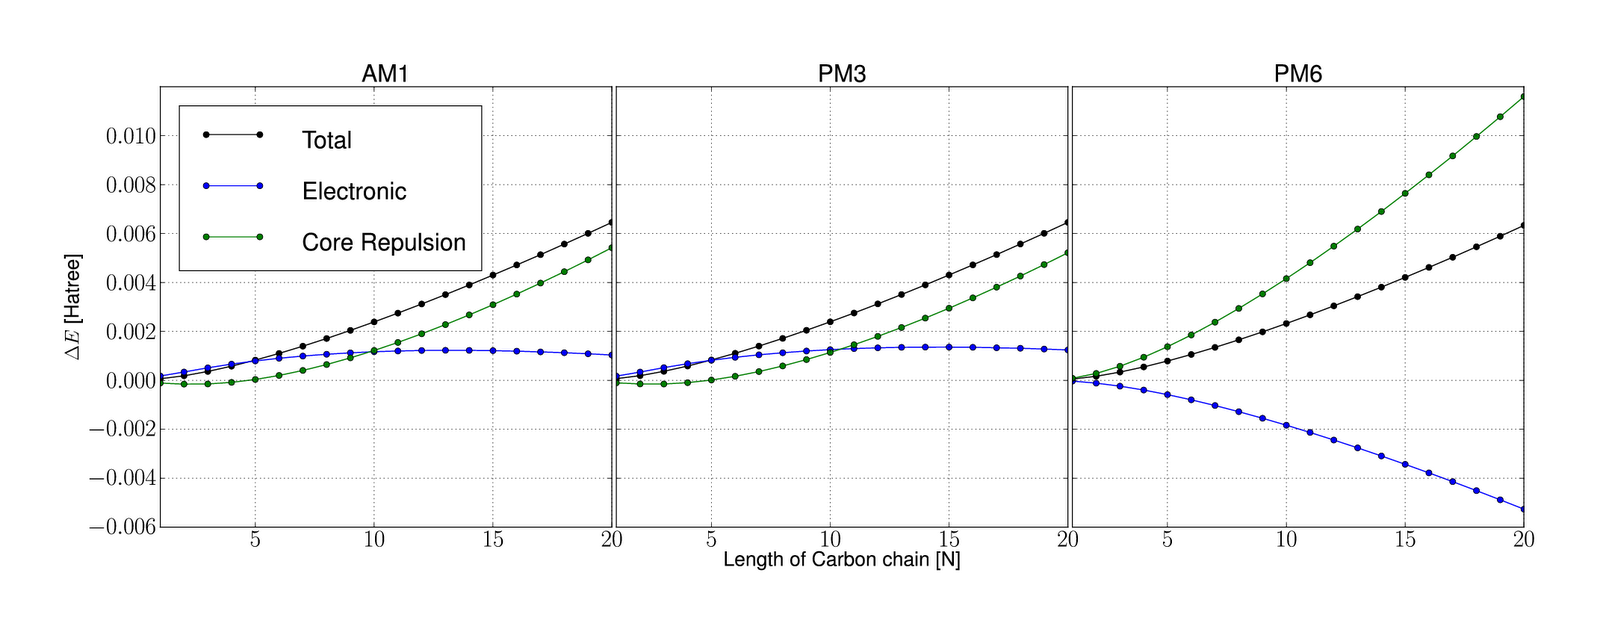
Figure 1: Errors are looking bad</em></p>

<p>Energy difference $\Delta E$ is calculated from mopac energy minus the corresponding gamess energy.</p>

<p>Arrgghh! How am I going to implement a new method, when the already implemented methods varies this much from the original program?</p>

<p>Okay, so the problem was that the SE part of GAMESS was based on a very old version of MOPAC, and so we figured alot of the energy deviation must be originating from the lack of update on physical constants. The MOPAC integrals use two physical constants to calculate the integrals in atomic units, namely bohr radius and electron volts, so by using grep I found all the places where the constants/variables were defined (which was alot!), and then updated acording to the constant defined on MOPAC’s website using a common block, instead of alot of local instances.</p>

<p>This resulted in</p>

<p><img src="/blog/assets/images/errorbar_new_am1pm3pm6.png" alt="Errors are better" />
<em>
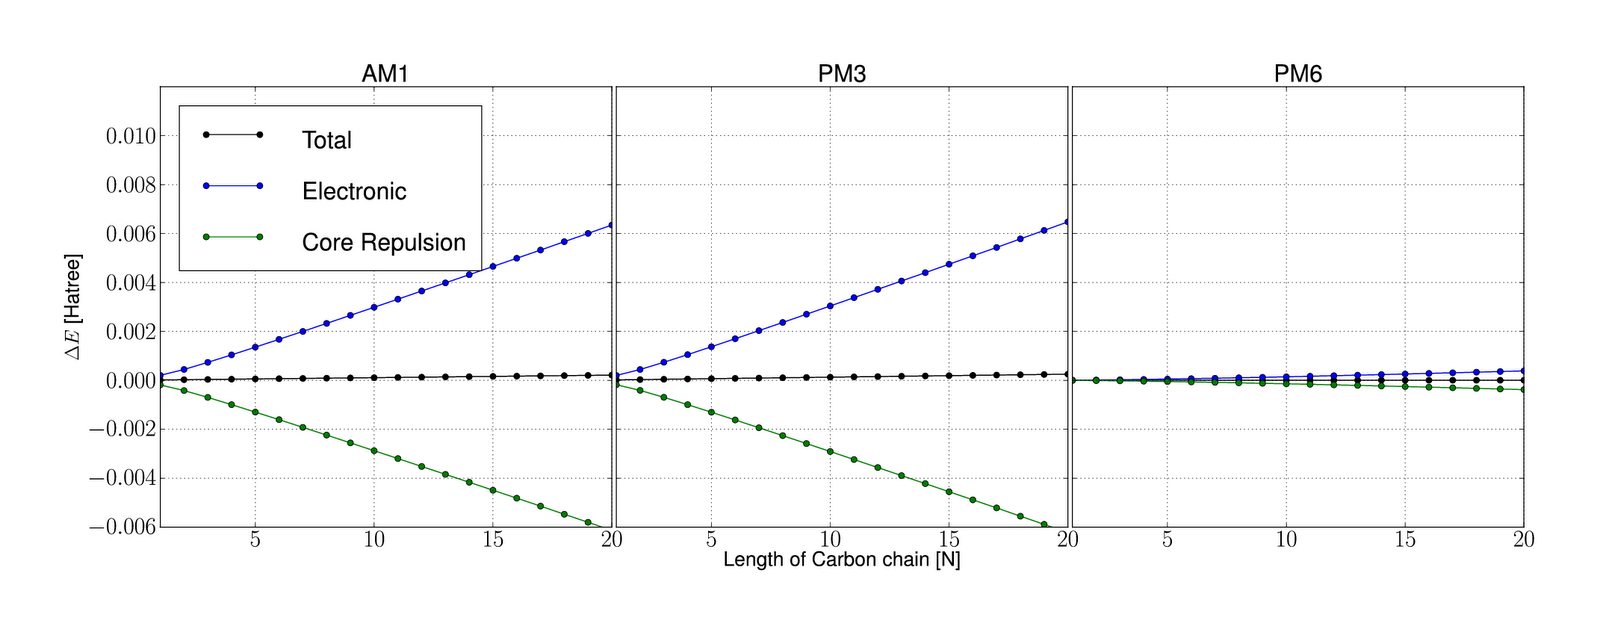
Figure 2: Errors are looking .. better</em></p>

<p>Okay, but is this better? Hell yeah! The total energy is clearly more stable compared to MOPAC energy, which is the energy that matters most. The deviation in the nuclear and electronic energy looks very much linear which hints to more constants needed to be updated. Note I have only updated the constants located in MOPAC part of GAMESS and therefor only effects the semi-empirical part of GAMESS.</p>

<p>However the effect is there, and even though the energy is working now, it will prove a problem for people who wants to reproduce data already calculated with GAMESS. So be warned GAMESS users, keep a copy of your GAMESS when the PM6 update is integrated in GAMESS-US.</p>

<h2 id="pm6-gradient">PM6 Gradient</h2>

<p>The integration of gradient was actually really easy, because GAMESS only uses numerical gradients for semi-emperical calculations.</p>

<p>Am I done? Unfortunately no. To get PM6 fully working I need to implement the d-integrals from MOPAC. As it is now only s- and p-orbitals are used for calculating the integrals. Is that easy? No.</p>

<p><strong>To be continued…</strong></p>

<p><strong>tldr</strong>; PM6, PM3 and AM1 did not work as expected, which was partially fixed by updating physical constants in the semi-empirical part of GAMESS. PM6 energy and gradient now works up to including Ne, but will need d-orbitals before it is fully operational.</p>]]></content><author><name></name></author><category term="chemistry" /><category term="gamess" /><summary type="html"><![CDATA[Okay, so I’m working on implementing the semi-empirical method PM6 (by Jimmy “Mopac” Stewart) in GAMESS-US.]]></summary></entry></feed>